Binkies and Briefcases

SUBSCRIBE

  • About
    • Work With Me!
      • Blog & Small Business Consulting
    • Disclosures
  • Popular Posts
  • Adoption & Special Needs
  • Saving Money
  • Recipes
    • Breads
    • Breakfasts
    • Sides
    • Soups
    • Entrées
    • Desserts
  • For the Home
    • For the Home
    • Beauty
    • Crafts
      • For Kids
  • My Books

IKEA Kitchen Cabinet Update: How we feel about our IKEA kitchen 2 years later.

June 15, 2015 By: Stephanie28 Comments

If you're new here, you may want to subscribe to my Email Newsletter. Thanks for visiting!

Welcome back! Be sure to check out my Email Newsletter. Thanks for visiting!

Posts on this blog contain affiliate links to some products mentioned. 

IKEA kitchen cabinets are a big project to take on yourself. Are they worth it? What are the pros and cons? Read what one couple has to say about their experience two years after installing their IKEA kitchen.


It has been two years since I took these pictures of Eddie putting together our IKEA kitchen cabinets. I still get quite a few emails asking how we like our kitchen and how our cabinets are holding up to everyday wear and tear, so I thought an update post was in order. 

I have hesitated to share the finished pictures of my kitchen on the blog because it certainly isn’t “Pinterest perfect.” We haven’t finished building our range hood and we still haven’t installed a backsplash. But I know those are dumb reasons to keep from sharing our real life with you, so here it is- fingerprints on the refrigerator and all. 

We purchased about 70% of our kitchen from IKEA. The cabinets, sink, faucet, and many of the appliances were purchased there. The flooring, counters, hardware and refrigerator were bought from other stores. In this post I will walk you through the pros and cons of our IKEA kitchen. 

IKEA cabinets customized


The PROs

  • When we were building our house I knew I wanted white Shaker style cabinets. IKEA offered the most affordable option with the best warranty in that category by far. 
  • They performed very impressively in a study done by Consumer Reports. The basic IKEA model outperformed ten other brands of higher cabinet grades, including names like Thomasville and KraftMaid.  Direct quote from Consumer Reports: “The ready-to-assemble Ikea outperformed much more expensive units, despite its low price. High-quality drawer hardware and doors and a robust mounting strip helped.”
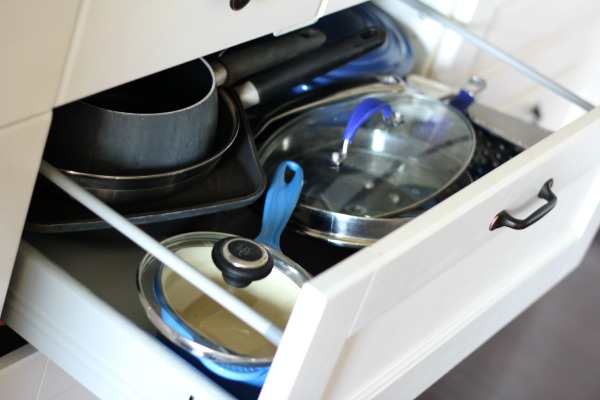
  • That’s true. I really do like the drawers. They are metal and they are deep. They are strong and they hold a lot of stuff.  

deep drawers in IKEA cabinetsbeadboard to cover the side of the IKEA island

  • We were able to get all of the custom features we wanted within our budget. I wanted a pull-out trash can, a panel-front dishwasher, a separate oven and cooktop, and a double bowl farmhouse sink. I also wanted a large island with outlets in either side. And I wanted my microwave to be built-in, but away from the stove, so it wouldn’t be in my face when I was cooking. 
  • We bought our kitchen during IKEA’s 20% off sale and saved so much money that we were able to afford to get everything on my list, plus additional cabinetry to do a built-in wet bar in another part of our house that hadn’t even originally been in our house plans, and we still stayed within our budget. Plus, we were then able to afford Corian counters instead of the laminate the was originally in our builder’s quote. 
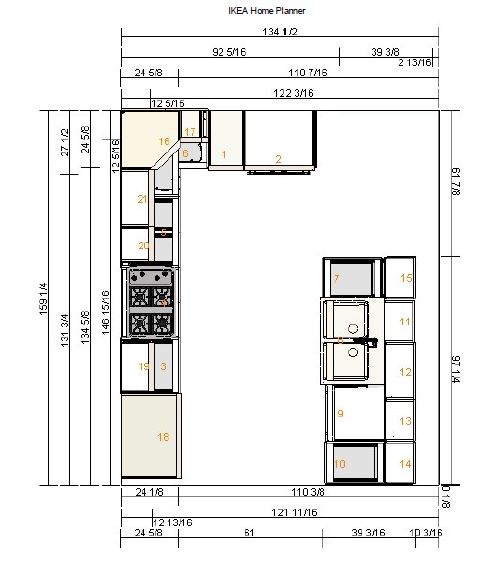
  • Out of all of the online planning tools that I tried to use throughout our house-building process, I found IKEA’s kitchen planner to be the easiest to use and most accurate. 

ikea-kitchen-plan


  • I really appreciated their larger options for over-the-refrigerator cabinets. We have very high, vaulted ceilings in our great room (the area that the kitchen opens into), and I wanted tall cabinets anyway. But it is a personal pet peeve of mine when cabinets over the refrigerator are sunken back, impossible to reach, and short. I think it looks dumb and it’s not practical at all.  
  • We were able to put electricity in the sides of the island by covering the sides with panels of bead board. Normally IKEA islands have a seam that runs vertically down the side if you are butting two sets of cabinets back to back, like we did in our large island. We couldn’t set our cabinets that close together because we had to leave a gap for the plumbing for the dishwasher. The bead board was an easy, inexpensive solution to cover the gap between the front-facing and rear-facing cabinets in our island. We took one of the cabinet doors to Lowe’s and had the paint department color match it. They did a beautiful job. Then we painted the sides of the island to match the rest of the cabinets. 

IKEA kitchen island

IKEA kitchen cabinets


white IKEA cabinets

ikea cabinets with farmhouse sink

hide the trash and dishwasher


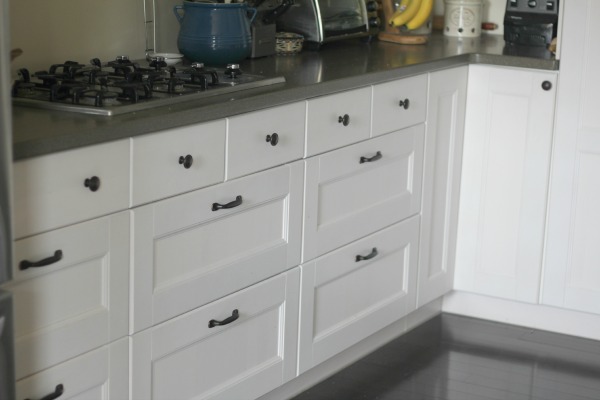
  • Another thing I love about the IKEA cabinets is the hinges. The slow-close feature that costs so much extra at all of the other retailers came as a very affordable upgrade on my cabinets. 
  • I also really love that the garbage can and the dishwasher are hidden. I think I said that already, but it’s worth repeating. 
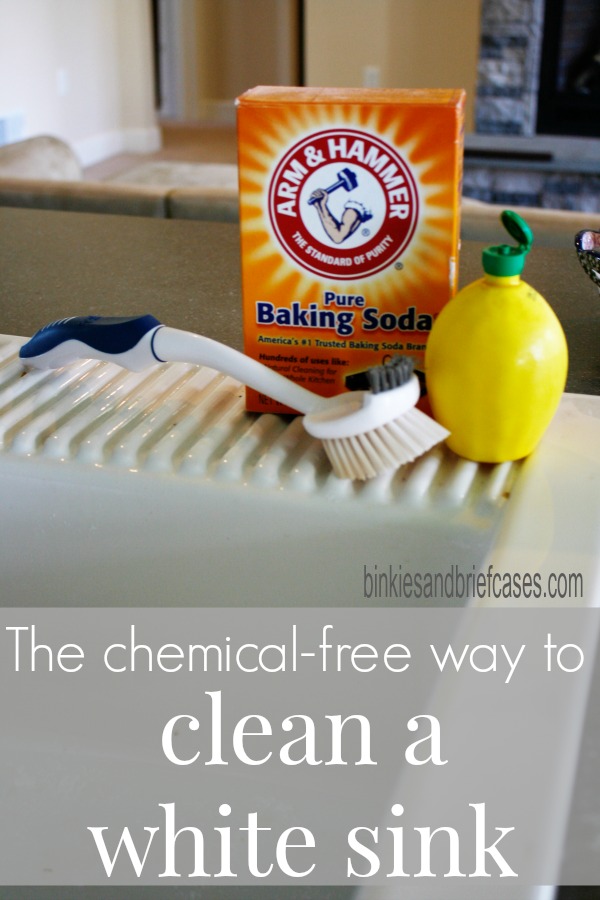
  • I LOVE my sink. Love it, love it, love it, love it. I would buy it again and marry it. It’s the DOMSJO double bowl white farmhouse sink. And if you have priced any other double bowl farmhouse sinks, you know there is no way you are finding another one for $300 that comes brand new with a 25 year warranty. My sink is huge. Each side fits a million dishes, huge pots, and I like that it is divided. It’s also deep, but no too deep. 
  • We also bought our dishwasher, stove, oven, and microwave from IKEA and so far (knock on wood) we haven’t had any issues with any of them. 
  • There are tons of affordable customization options for inside of the cabinets, under cabinet lighting, etc offered in the store as well. 

IKEA oven and microwave

Ok, let’s move on to the cons. Are you ready? 

The CONs

  • I have to be brutally honest. Just because you have successfully put together IKEA furniture does not mean that you are prepared to assemble an entire IKEA kitchen. It is a very complicated and sometimes frustrating undertaking. I felt very fortunate that Eddie is a professional engineer and we had a contractor and crew on-site during this process. Even then, and even working in a brand new, totally level space sometimes we ran into complications we didn’t anticipate, like the kitchen planning software not taking into account that we would need a space for the dishwasher plumbing in the island, which would therefore leave a gap between all of the other cabinets. If I had taken on this project by myself I 100% would have given up and hired someone to do it for me. (I say that as a woman who has confidently designed and built her own furniture and knows how to use power tools.)  Know your limits. This probably is not something you can do by yourself in one weekend.  
  • We had to think about what to do with the cabinets while our house was being built. Since they had to be stored somewhere and we were renting a small, temporary apartment at the time, we rented a storage unit to keep them in. That was an additional expense and kind of a pain. We would put together each cabinet at our rental apartment, then drive it over to our storage unit for safe keeping. We were under a time crunch to get all of the cabinets put together by the time that the construction crew was ready to work on our kitchen so that we wouldn’t slow down the progress on the rest of our house, so that our new house would be finished in time for us to move out of our rental apartment when the that short-term lease was up.  
  • This is just a matter of personal taste, but I am a little bummed that the new gray IKEA cabinets were not an option when we were building our house. I really like those and I might have chosen them, at least for an accent or in the island. 
  • There is no white base board option for under the dishwasher.  The only way to get the trim flush would have been to take the black trim off of the bottom of our dishwasher and my husband didn’t want to take apart a brand new appliance, so we left it like it was. That means there is a small gap in our trim under our dishwasher. That’s really a very minor complaint. I actually forgot about it until I saw the pictures I took today. 
  • As much as I love my sink (and I do!) I have 2 complaints about it: The first one is that it is really hard to clean all of those decorative ridges in the top. The second is that I don’t love that there is only one hole and therefore only really one option for a pull-down sprayer if I want a faucet with a sprayer in my kitchen, which I do. I really prefer to have a separate sprayer so that we can attach a water filter to the faucet for our drinking water. IKEA faucets (even the one on my wet bar) don’t seem to be compatible with Brita or similar water filters. 
  • I really, really like my kitchen. I don’t have a lot of negative things to say about it, other than it’s not quite finished yet.  I can’t blame IKEA for us never getting around to installing a backsplash, but I do wish they had some nice wooden decorative range hood options to match the cabinets. I really hate the industrial style metal ones they have in the store. They don’t match the Craftsman style look of the rest of our house at all. I don’t even really love my stainless steel appliances, but I married an engineer who does like that look, and I didn’t want an entirely white kitchen anyway. In regards to the rage hood, right now we are stuck building something custom and we just haven’t gotten to that yet because we are busy parenting three small kids. 

I know our kitchen looks like the kitchens in the IKEA showroom, which is a negative if you go by the comments on lot of message boards, but honestly I don’t really care because I like the kitchens in the IKEA showroom. 

UPDATE: 

We did get around to building a wooden range hood. I love the way it turned out! 

Build a wooden range hood with IKEA cabinets

FURTHER UPDATE:

We also got around to installing our backsplash…eventually. We chose to go with thin bricks, individually laid. (You can get the brick we used through my Amazon affiliate link here: Brick Backsplash. We followed the directions recommended by the manufacturer to install it.)

Ikea kitchen cabinets with custom range hood and brick backsplash

For more about my sink, check out how I clean it in this post: 

how to clean a white sink

Share this:

  • Click to share on Facebook (Opens in new window)
  • Click to share on Pinterest (Opens in new window)
  • Click to share on Twitter (Opens in new window)
  • More
  • Click to share on Pocket (Opens in new window)
  • Click to share on Tumblr (Opens in new window)
  • Click to share on Reddit (Opens in new window)
  • Click to share on LinkedIn (Opens in new window)
  • Click to print (Opens in new window)

How to Make a Scrunchie (and Some Memories in the Process)

June 12, 2015 By: Stephanie2 Comments

How to Make a Scrunchie


When my grandmother passed away last year she left behind a massive collection of decorative handkerchiefs. My sister and I divided them up between ourselves and the ones I took have been sitting on a shelf in my closet collecting dust ever since. 

with Grandy

When I started working with Nickelodeon® this year to coordinate the Middle School to the Max party for the BlogU conference, I thought about Grandy a lot. My grandmother would have loved everything that BlogU stands for. She would have loved to see the connections that women were making with each other, she would have loved that I own my own business, she would have loved the creativity and the energy and the learning, and even the “creative language” that sometimes finds its way into the presentations.

I wanted a way to take her with me this year, at least in spirit. So I took one of those fancy decorative handkerchiefs and I cut it into pieces. I knew she wouldn’t care. I could just hear her saying, “Go ahead, I was only going to blow my nose in the thing.” I turned it into a scrunchie because the theme of this year’s party was #MiddleSchoolAwkward and when I was in middle school in the 90’s I always had a scrunchie on my wrist, many of them I made myself with the very method I’m about to show you. So in honor of Grandy and her fancy hankies, here is how to make a hair scrunchie: 

What you need:

  • 2 long rectangular strips of fabric, about 3 inches thick.
  • 1 strip of elastic, the diameter of the scrunchie you’d like to make
  • 1 safety pin
  • thread
  • a sewing machine or needle

How to make your own schrunchie

  1. Place the right sides of the fabric together and sew the long sides together, leaving both short ends open. 
  2. Turn the fabric tube you have created right-side-out.
  3. Attach the safety pin to one end of the elastic and slide the elastic through the fabric tube, “scrunching” the fabric as you go.
  4. Sew the ends of elastic together and place the elastic inside of the scrunched fabric.
  5. Sew the fabric shut and you have yourself a genuine homemade scrunchie.    

Last Saturday night I took my newly made scrunchie with me and I wore it proudly on my left wrist all night during our Middle School to the Max party. We celebrated the premiere of Nickelodeon’s ® new show 100 Things To Do Before High School ™ and decked ourselves out in our most awkward gear. I even bought fake braces for the occasion. It was a blast and I was glad to have the memento with me to remember Grandy by.

 #AwkwardMiddleSchool photos


This is a sponsored post written by me on behalf of Nickelodeon®. All opinions are my own. 

Share this:

  • Click to share on Facebook (Opens in new window)
  • Click to share on Pinterest (Opens in new window)
  • Click to share on Twitter (Opens in new window)
  • More
  • Click to share on Pocket (Opens in new window)
  • Click to share on Tumblr (Opens in new window)
  • Click to share on Reddit (Opens in new window)
  • Click to share on LinkedIn (Opens in new window)
  • Click to print (Opens in new window)

Five Ways to Get Involved In Your Child’s Education

June 11, 2015 By: Stephanie1 Comment

Tips from a teacher for how to get involved in your child's education

Are you looking for ways to get involved in your child’s education? 

I am excited to be an ambassador this year for the #FairFundingPA campaign that is encouraging parents to get involved and use social media to let their legislators know that the way education is funded in our state is important.

In my life before staying home with my kids, I was an elementary school teacher and a gifted specialist. One of the most frequently asked questions I got from parents was about ways they could get more involved and help their children learn. Many parents wanted to be a bigger part of the school experience, but just weren’t quite sure how to go about it. Here are a few easy ways to bring some hands-on involvement into your child’s education.

  1. Visit the Campaign for Fair Education Funding to learn more about other ways to get involved!  You can attend the upcoming rally in Harrisburg, contact your own legislator, or sign up for their email newsletter to learn about more ways to get involved. 
  1. Get Messy. Practice spelling or sight words in sidewalk chalk or in shaving cream on the dining room table. Do a science experiment together. Help to visualize math problems by adding or taking away chocolate chips, then eating them when the work is over. Find ways to take the drudgery out of schoolwork by turning it into more of an enjoyable hands-on experience.

painting

  1. Let them read what they want at home (within reason). Of course you should not give a second grader a copy of Romeo and Juliet, because the content would not be appropriate, but reading is reading. Graphic novels (more commonly referred to as comic books), magazines for kids, and books geared toward a specific interest are great ways to encourage reading. If you have a boy who loves reading Star Wars comics, don’t stress too much that he isn’t reading enough of a different genre. As we said, reading is reading. Your child is being exposed to many required texts at school. Reading at home should be as pleasurable as possible.
  2. Ask your child’s teacher how to get involved. Sometimes the best way to find out the answer to a question is simply to ask it. Your child’s teacher may have some volunteer opportunities in the classroom that you hadn’t realized were possibilities. Maybe you could stop in and be a guest reader before work one day. Perhaps the school is looking for speakers for career day, and you or your spouse would be a good fit. When I was teaching, I had a parent volunteer come in once a week and work one-on-one with my students on their spelling words. Other teachers in my school had “copy moms” who ran photocopies for them. There are a lot of ways to get involved!
  3. Use Technology to Your Advantage. It’s no secret that kids love their screen time. There are actually quite a few apps available now, like Reading Rainbow or Mr. Pencil that you could sit and do for a few minutes with a younger student on a tablet. If you are a tech-savvy parent, use that knowledge to your advantage. Join me and the rest of the #FairFundingPA ambassadors June 15 when we attempt to take over Twitter. 

twitter chat

This is a sponsored post written by me on behalf o the Campaign for Fair Education Funding. All opinions are my own.

Share this:

  • Click to share on Facebook (Opens in new window)
  • Click to share on Pinterest (Opens in new window)
  • Click to share on Twitter (Opens in new window)
  • More
  • Click to share on Pocket (Opens in new window)
  • Click to share on Tumblr (Opens in new window)
  • Click to share on Reddit (Opens in new window)
  • Click to share on LinkedIn (Opens in new window)
  • Click to print (Opens in new window)
  • « Previous Page
  • 1
  • …
  • 48
  • 49
  • 50
  • 51
  • 52
  • …
  • 268
  • Next Page »
  • Facebook
  • Instagram
  • Pinterest
  • RSS
  • Twitter

Welcome! I’m Steph.

This is a little corner of the internet we like to fill with honesty, heart, and humor. Read More…

Cover for Binkies and Briefcases with Stephanie Giese
19,232
Binkies and Briefcases with Stephanie Giese

Binkies and Briefcases with Stephanie Giese

Stephanie Giese is an indie author based in Florida. She writes stories about realistic problems with humor, heart, and sass. Her work has a strong focus on mental health and consent. Her North Bay small-town romance series is set for release in 2025.

Binkies and Briefcases with Stephanie Giese

3 months ago

Binkies and Briefcases with Stephanie Giese
I know it’s a small thing, but I believe small things can add up to big changes. my entire North Bay series, including Out of Left Field, Right as Rain, and Way Off Base, is free on Kindle from Jan. 30-Feb. 3. Please take the funds you might have spent on my books this week and reallocate them toward the areas in our country that need them the most. Follow creators like Dad Chats who can direct you toward practical needs local to them. I hope my quirky romcoms can bring you some comfort and joy during difficult times, and I hope together we can take small, practical steps toward big changes. ... See MoreSee Less

Photo

View on Facebook
· Share

Share on Facebook Share on Twitter Share on Linked In Share by Email

Binkies and Briefcases with Stephanie Giese

3 months ago

Binkies and Briefcases with Stephanie Giese
I know there is an overall feeling of helplessness in our country right now. So many of us are at a loss for what to do beyond making phone calls and social media posts (which are still important, but can feel like not enough). I believe strongly in the power of small things adding up to big ones. As one person, I might not be able to do much, but what I CAN do is use my voice and my books to work toward the change I’d like to see. That’s why, for the next five days, from Jan. 30-Feb 3, I’m making the Kindle versions of my entire North Bay series (Out of Left Field, Right as Rain, and Way Off Base) completely free. Art has power, and I do hope these comedies can bring you some comfort and joy in difficult times, but most importantly, I also hope you’ll consider redirecting the funds you might’ve spent on my books and donating instead to one of the many charities working tirelessly in our cities right now. If you are located in an area like Minnesota or Portland, please use the space below to make people aware of the organizations in your area that need help. ... See MoreSee Less
View on Facebook
· Share

Share on Facebook Share on Twitter Share on Linked In Share by Email

Reader’s Choice

Image HTML map generator

Follow Me on Pinterest

featured-on

What You’re Saying

  • 28 Best Stone Fireplace Ideas And Designs - Perfect Decor Place on DIY Stone Fireplace with AirStone
  • Kevin Hicks on How to Budget for Building Your Own Home
  • Amy on DIY Stone Fireplace with AirStone
  • Gendered clothing - GenderEd on A Target Intervention on Behalf of My Daughters
  • Wellshop Store on Dressing Our Daughters: How Target Responded to My Last Blog Post

Latest Posts

ALL I Never Knowed: The Book Is Here!

It’s finally here, in my hands. It has been a loooong time in the making, but our book, All I Never Knowed: Mental Illness, a Mother’s Love, and a Broken System, is available now. The official launch date is next Tuesday, Oct. 5th. But starting now, you can order from all major retailers. Here’s where […]

Share this:

  • Click to share on Facebook (Opens in new window)
  • Click to share on Pinterest (Opens in new window)
  • Click to share on Twitter (Opens in new window)
  • More
  • Click to share on Pocket (Opens in new window)
  • Click to share on Tumblr (Opens in new window)
  • Click to share on Reddit (Opens in new window)
  • Click to share on LinkedIn (Opens in new window)
  • Click to print (Opens in new window)

Save Money with Fetch

Hey everyone! This is Chelsea, Steph’s asistant, back with the simplest app for getting cash back on things you’re already buying! We’ve covered Ibotta, Shopkick, Coupons.com, Swagbucks and we’re all saving hundreds of dollars by now, right? RIGHT!? I’m really hoping you guys have jumped on the rebate app savings train because it’s just so […]

Share this:

  • Click to share on Facebook (Opens in new window)
  • Click to share on Pinterest (Opens in new window)
  • Click to share on Twitter (Opens in new window)
  • More
  • Click to share on Pocket (Opens in new window)
  • Click to share on Tumblr (Opens in new window)
  • Click to share on Reddit (Opens in new window)
  • Click to share on LinkedIn (Opens in new window)
  • Click to print (Opens in new window)

Splendid Spoon Review

I was excited to receive a box of products to try from Splendid Spoon this summer! They invited me to try their line of plant-based, ready-to-eat foods and delivered them right to my door. Check one in the pro column for convenience. I did receive these products free of charge in order to rate them […]

Share this:

  • Click to share on Facebook (Opens in new window)
  • Click to share on Pinterest (Opens in new window)
  • Click to share on Twitter (Opens in new window)
  • More
  • Click to share on Pocket (Opens in new window)
  • Click to share on Tumblr (Opens in new window)
  • Click to share on Reddit (Opens in new window)
  • Click to share on LinkedIn (Opens in new window)
  • Click to print (Opens in new window)

My Networks

#BlogHer15: Experts Among Us Voices of the Year Honoree