
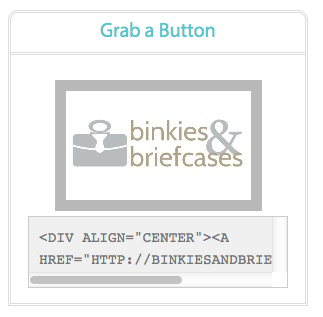
Whew. I finally figured out how to add a blog button with code to my sidebar. (That “with code” part was killing me) Do you see it over there? I’m so proud of myself. 🙂 If you are wondering what in the world I’m talking about, a blog button is a picture like this. When people click on it, it takes them right to your website. You can add it to your blog with the code underneath for people to copy and paste, like this:
It was actually really easy once I found the right tools.
Step 1: Create an image.
I like to do this in Picmonkey because it’s easy. Click “Edit a photo” and upload any image. It doesn’t matter which one because you are going to cover it up. On the left sidebar you will see a gray picture of some shapes, those are the overlays. Put a Geometric overlay over your photo in whatever color you want to be the background. Add your text and any other graphics you like with the other tools in PicMonkey.
Once it looks the way you want it to, click save and change the dimensions to make it button size. Mine is 145 & 160-ish. A lot of people recommend 125 x 125.
Step 2: Create a Draft Blog Post
You need somewhere to host your image. All you have to do is create a draft blog post and upload your image there for safe keeping. Don’t publish it. Name it something easy to find in the future like “BUTTONS, Do Not Delete.”
Step 3: Use This App
I wasted a lot of time trying to figure out how to do it myself, but why bother when there’s a free app for that?
The Grab My Button Code Generator from My Cool Realm.com worked well for me on the first try.
Type the name of your site and your blog address in the appropriate spaces.
To find your image url, go into the draft blog post you made with the image in it. Click on html. Somewhere inside the code you should see a line that starts with http and ends with .jpg, like this:
http://binkiesandbriefcases.com/wp-content/uploads/2012/10/button2.jpg
Copy and paste just that part of your code into the line that says image URL.
Generate the code, then copy it.
Step 4: Add the code to your sidebar
In Blogger you would do this by going to Layout, Add a Gadget, HTML/JavaScript, then pasting the code in the box.
In WordPress I went to Appearance, Widgets, Text (arbitrary text or html) and pasted my code in the box.
You are probably smarter than I am and have already figured this out for yourself, but just in case, I hope it helped. 🙂
Check out more of my blog tips, like how to add customized social media icons and whether you should choose Blogger or WordPress for your blog.
And make sure to check out The BlogU Conference this June!


Thanks for this tutorial! I think I can do this thing!
Thanks for this! I’m just getting around to reading it because as usual, I’m drowning! Bookmarking…
Awesome! Can you do this with a Book Cover also, and add a link to buy your book somewhere?
Yes! You can.
YAY! you made my day!
I’d probably use this free image mapping tool instead (in step #3), unless you actually want the code underneath for people to be able to copy and paste.
http://www.html-map.com/ <- This one will just turn the image into a link, without the code underneath. I have a video tutorial for how to use it in this post: (It's the second video) http://binkiesandbriefcases.com/how-to-create-your-own-social-media-icons-a-video-tutorial/
Woo Hoo, even better.
This is something I definitely wanted to know how to do…thanks for sharing!
No problem, I’m glad I could help!
Many thanks for the tutorial! I’ll be certainly using this anytime soon!