Binkies and Briefcases

SUBSCRIBE

  • About
    • Work With Me!
      • Blog & Small Business Consulting
    • Disclosures
  • Popular Posts
  • Adoption & Special Needs
  • Saving Money
  • Recipes
    • Breads
    • Breakfasts
    • Sides
    • Soups
    • Entrées
    • Desserts
  • For the Home
    • For the Home
    • Beauty
    • Crafts
      • For Kids
  • My Books

How to Build a Floating Fireplace Mantle

November 15, 2013 By: Stephanie23 Comments

If you're new here, you may want to subscribe to my Email Newsletter. Thanks for visiting!

Welcome back! Be sure to check out my Email Newsletter. Thanks for visiting!

Thank you for your patience. I know it has been a long time coming, but we finally figured out how to build a floating fireplace mantle, and we’d love to show you how we did it!

Build your own fire place mantle with 5 boards

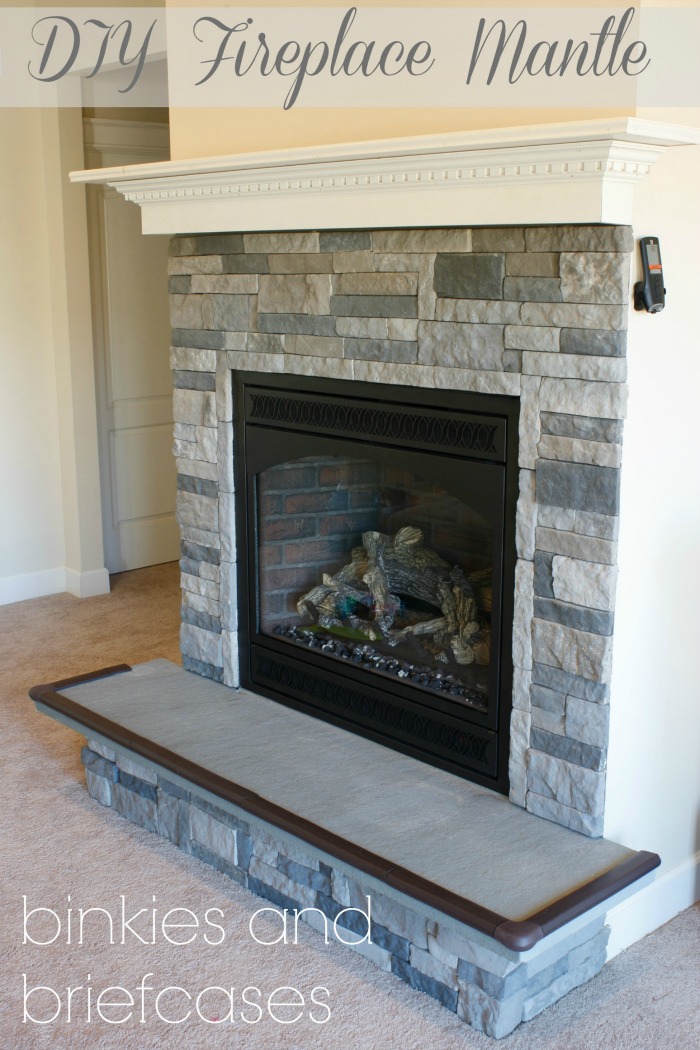
We still need to finish filling the nail holes and some touch up paint, but for the most part, it’s show-off-able.

Want to see how you can make one of your own? Watch our video!

http://binkiesandbriefcases.com/wp-content/uploads/2013/11/vidGzgMtg.mp4

It was surprisingly hard to find instructions online to build a floating mantle. We actually didn’t find any that looked like what I wanted, so we got creative and made things up as we went along.

Me: All I want is a chunky mantle that is classic and substantial, but not too simple-looking that fits well with the southern farmhouse feel of our home but isn’t distressed. And I need it to float in mid air and be sturdy enough to hold heavy stuff like Christmas stockings and giant candle sticks and not come crashing down on the kids.

Eddie: Oh is that all?

We went to Home Depot and I started taking out boards and holding them up to each other like a 10 foot long jigsaw puzzle until I figured out what I wanted. Then Eddie got to work with the “float in mid air” part. 

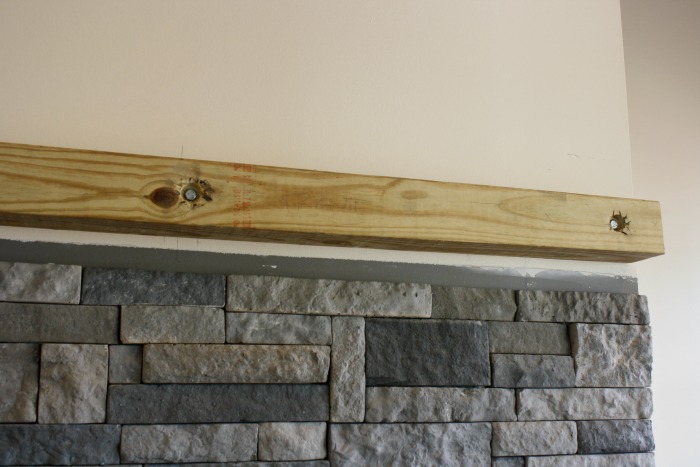
First we used lag bolts to hang a 4×4 securely on the wall, into three studs. This is what we attached all of the painted pieces to. If you are going to use pressure treated wood for this step, make sure you use galvanized or stainless steel screws, bolts, and nails for the whole project.We left a 3/4″ gap on each side of the 4×4, so that our mantle would be flush with the wall when we covered it up. 

HomeRight fireplace mantle

Then we used our handy dandy HomeRight paint sprayer and painted the pieces we were using to build the mantle. Besides the 4×4, we only used four boards from the hardware store to build our mantle. However, we still need to go back for one additional board to cover the bottom.
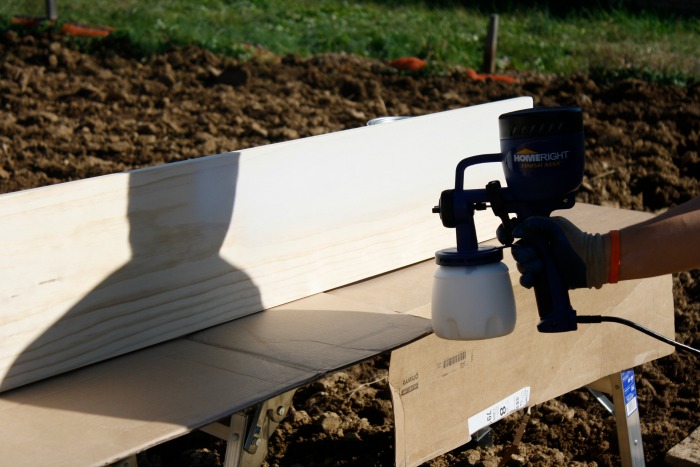
HomeRight sprayer

We used:

a 1×10″ board (for the top)

a 1 x 6″ board (for the “skirt”) 

a piece of decorative edge trim (for the top)

a piece of crown molding

Since our fireplace is an unusual size and yours is probably different, I’m not going to give you specific measurements, but I’m sure you can figure it out. It was a pretty simple process once the engineer (my husband, who really is an engineer) was confident we had a safe way to build it.  First Eddie attached the 1×10 to the top of the 4×4, making sure it was level. DIY Fireplace designDIY Fireplace mantle with 6 boards

Then we cut the 1×6 and used it to make a “skirt” around the front and sides of the 4×4. DIY fireplace from a few boards

I guess if you were looking for a really  simple mantle, at this point you could be done.
DIY mantle

But we wanted to fancy it up a bit, so we added a decorative edge around the 1×10 on the top. DIY Fireplace mantle 

Then we put crown molding around the “skirt” as well.

DIY crown molding mantle


All that’s left is to fill in the nail holes, caulk, and touch up paint. (We are planning to cut a piece of plywood to cover up the bottom as well.)

We put a baby bumper around the hearth to soften the sharp edges for the kiddos.  

Build your own fire place mantle with 5 boards

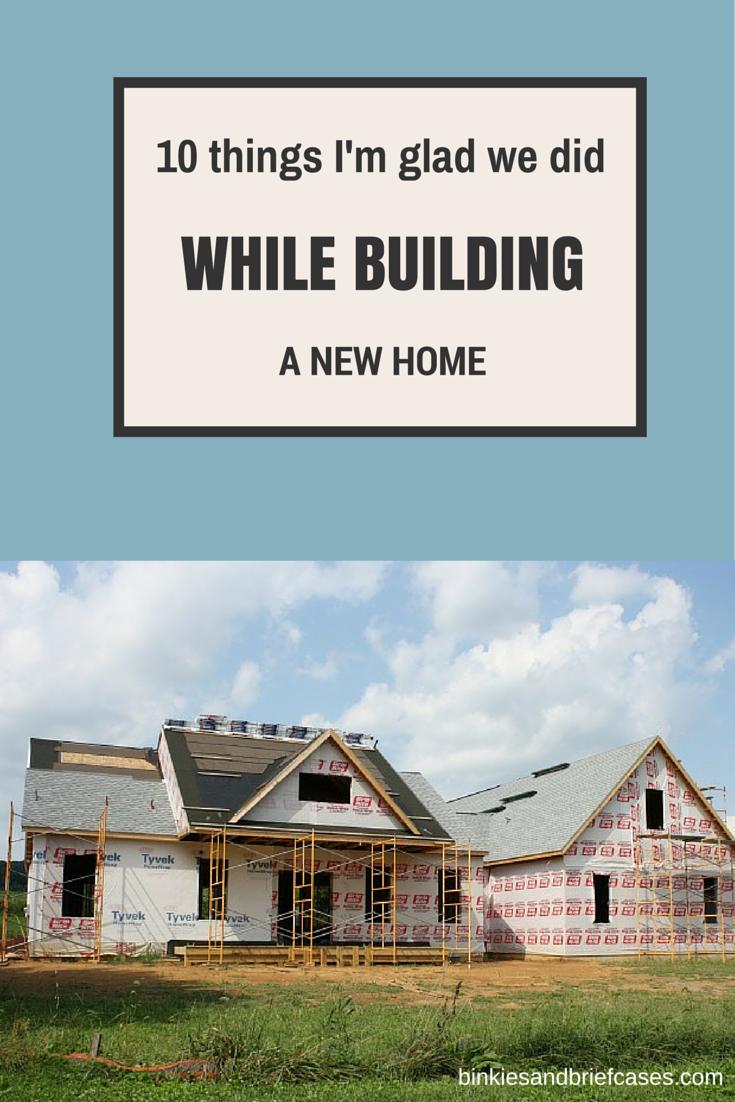
If you’re interested in how we did the rest of this fireplace wall, check out these posts. The stone hearth and the AirStone wall are also D-I-Y projects!

If you like this posts, I would so appreciate your shares and pins! And please pop over to my Facebook page so that I can get to know you too!

Installing the flagstone hearth

DIY stone wall

The Mantle, part 1

Also check out 

A list of things to consider when building a new home. Some great suggestions on this list!

Share this:

  • Click to share on Facebook (Opens in new window)
  • Click to share on Pinterest (Opens in new window)
  • Click to share on Twitter (Opens in new window)
  • More
  • Click to share on Pocket (Opens in new window)
  • Click to share on Tumblr (Opens in new window)
  • Click to share on Reddit (Opens in new window)
  • Click to share on LinkedIn (Opens in new window)
  • Click to print (Opens in new window)

Comments

  1. Lisa @ Charlie The Cavalier says

    November 15, 2013 at 12:33 pm

    Looks amazing. I love all the molding. Great job!

    Reply
    • Stephanie says

      November 16, 2013 at 7:51 pm

      Thanks, Lisa! We certainly couldn’t have done this project without you. I’m so happy you suggested the Airstone!

      Reply
  2. Meredith says

    November 18, 2013 at 3:10 pm

    Having seen this in-person, I can attest that it is GORGEOUS. And that you wow me–always. xo.

    Reply
  3. Cheryl says

    March 23, 2014 at 5:40 pm

    Love this guide! So clear and love the beautiful pictures. I was trying to figure out how to build the entire shelf but this post helped me with the shelf immensely! If anybody’s looking for the entire mantel surround, you can check out the other one I used:

    http://www.portablefireplace.com/blog/how-to-build-fireplace-mantel-from-scratch/

    The photo’s aren’t as high quality but the information is there. I’d refer back to Stephanie’s post for the mantel shelf. Oh, and the video is quite helpful as well. Thanks Steph!! <3

    Reply
    • Stephanie says

      September 7, 2015 at 5:16 pm

      Thank you, Cheryl!

      Reply
  4. Cassie says

    July 7, 2014 at 1:40 pm

    This looks great. We’re looking at replicating this exactly! One question, did you predrill the holes for the lag bolts?

    Reply
    • Stephanie says

      July 7, 2014 at 1:42 pm

      I don’t think so. If I recall correctly, we used an impact driver to drive them straight into the studs.

      UPDATE: My husband has corrected me and says that he did pre-drill them. I apologize for any confusion!

      Reply
  5. carrie says

    August 20, 2014 at 8:35 pm

    I finally got the mantle I wanted thanks to this post. Our fireplace is a stone brick from floor to ceiling so attaching the 4th was difficult but done. So pleased with how it turned out. Thank you

    Reply
    • Stephanie says

      September 7, 2015 at 5:14 pm

      I am so happy to hear that! Thank you for coming back to let me know it worked for you!

      Reply
  6. char says

    November 25, 2014 at 9:35 am

    Where did you get your edge trim for the shelf portion??

    Reply
    • Stephanie says

      November 25, 2014 at 9:47 am

      All of our trim came from Home Depot.

      Reply
  7. Frank says

    January 20, 2015 at 5:48 pm

    What size lag Bolts? What did you use to make holes in 4×4?
    Thanks

    Reply
    • Stephanie says

      January 21, 2015 at 11:05 am

      My husband handled that part of the project. I emailed him at work today with your question, and this was his reply, I hope it helps!

      “I think we used lag bolts that were 5″ or 5 1/2″. This ensured a minimum of 2 1/2″ of embedment into the stud. Need to pre-drill or you risk splitting the studs. I just used a spade bit to make the holes to recess the lag bolt heads that was big enough to fit the socket around the head. Can’t remember the exact size. Probably 1 1/2″ would do it. It’s ok it they are a little too wide – it won’t hurt anything.”

      Reply

Trackbacks

  1. Girls' Reading Nook: No Money Makeover - Binkies and Briefcase says:
    February 10, 2014 at 6:31 am

    […] in the garage, using Ana White’s plans, and painted them with the paint left over from our fireplace mantle project. I tried to get creative to make the rest of the space cute and […]

    Reply
  2. DIY Stone Fireplace with AirStone - Binkies and Briefcases says:
    February 23, 2014 at 4:28 pm

    […]  UPDATE: See our finished fireplace and how to build a floating fireplace mantle: […]

    Reply
  3. A Year Later | Home Renocation says:
    January 4, 2015 at 1:24 pm

    […] there was on the internet about building a floating mantel.  I did find one really nice blog post that I basically followed along with, but I kind of felt like I had stumped the internet.  So […]

    Reply
  4. So You Think You Want a Swagger Wagon? What to Consider Before Buying a Minivan - Binkies and Briefcases says:
    January 15, 2015 at 8:00 am

    […] My husband actually really likes using our minivan for hauling lumber. He puts it down the center aisle, all the way up to the dashboard. We’ve had 12 foot long pieces of wood stay completely dry on the way home in the pouring rain when we were working on our floating fireplace mantle.  […]

    Reply
  5. Ten Things I'm Glad We Did While Building A New Home • Binkies and Briefcases says:
    October 2, 2015 at 3:23 pm

    […] You might also want to check out how we installed our stone fireplace and how we built our floating fireplace mantle.  […]

    Reply
  6. How to Make a Snow Globe: Winter Craft • Binkies and Briefcases says:
    December 2, 2015 at 12:44 pm

    […] wear away a bit, but I am okay with that. For now my homemade snow globe is enjoying its place on our mantle, and it was fun to show the kids how we could make these whimsical crafts […]

    Reply
  7. 18 Gorgeous DIY Fireplace Mantels to Decorate Your Home - Lemon Slide says:
    December 15, 2017 at 6:08 am

    […] Build this project […]

    Reply
  8. How To Build Your Own Fireplace Mantle Part 1 • Binkies and Briefcases says:
    March 30, 2018 at 12:35 pm

    […] UPDATE: It’s finished and you can see it here:  […]

    Reply
  9. Building the Dream: Painted Walls! • Binkies and Briefcases says:
    April 16, 2021 at 9:19 am

    […] our DIY fireplace looks on this wall now! We still have some caulking to do and we need to build a mantle, but it has really come a long way in just a little over a […]

    Reply
  10. Building the Dream: Let There Be Lights (and tile, and vanities, and molding...) • Binkies and Briefcases says:
    April 17, 2021 at 3:06 pm

    […] and I (mostly Eddie) will be working tirelessly to finish the kitchen details and the fireplace mantle we are designing for HomeRight. (More on that […]

    Reply

Leave a Reply Cancel reply

  • Facebook
  • Instagram
  • Pinterest
  • RSS
  • Twitter

Welcome! I’m Steph.

This is a little corner of the internet we like to fill with honesty, heart, and humor. Read More…

Cover for Binkies and Briefcases with Stephanie Giese
19,483
Binkies and Briefcases with Stephanie Giese

Binkies and Briefcases with Stephanie Giese

Stephanie Giese is an indie author based in Florida. She writes stories about realistic problems with humor, heart, and sass. Her work has a strong focus on mental health and consent. Her North Bay small-town romance series is set for release in 2025.

Binkies and Briefcases with Stephanie Giese

2 months ago

Binkies and Briefcases with Stephanie Giese
This one's on me, Bookworms! Grab your FREE book ... See MoreSee Less

Hello My Radiant RomCom Readers,

wix.to

I have fun news! For a limited time, as a special gift from me to you, the eBook version of Out of Left Field is totally FREE this week to download from Amazon. That's right, you don't even have to be...
View on Facebook
· Share

Share on Facebook Share on Twitter Share on Linked In Share by Email

Binkies and Briefcases with Stephanie Giese

2 months ago

Binkies and Briefcases with Stephanie Giese
Hello My Brilliant Bookworms ... See MoreSee Less

Hello My Brilliant Bookworms,

wix.to

I'm checking in from the pits of work-still-in-progress despair. (Book 3 is actually going pretty well, but I'm feeling dramatic today.) Way Off Base, Book 3 in my North Bay series, is set to go to th...
View on Facebook
· Share

Share on Facebook Share on Twitter Share on Linked In Share by Email

Reader’s Choice

Image HTML map generator

Follow Me on Pinterest

featured-on

What You’re Saying

  • 28 Best Stone Fireplace Ideas And Designs - Perfect Decor Place on DIY Stone Fireplace with AirStone
  • Kevin Hicks on How to Budget for Building Your Own Home
  • Amy on DIY Stone Fireplace with AirStone
  • Gendered clothing - GenderEd on A Target Intervention on Behalf of My Daughters
  • Wellshop Store on Dressing Our Daughters: How Target Responded to My Last Blog Post

Latest Posts

ALL I Never Knowed: The Book Is Here!

It’s finally here, in my hands. It has been a loooong time in the making, but our book, All I Never Knowed: Mental Illness, a Mother’s Love, and a Broken System, is available now. The official launch date is next Tuesday, Oct. 5th. But starting now, you can order from all major retailers. Here’s where […]

Share this:

  • Click to share on Facebook (Opens in new window)
  • Click to share on Pinterest (Opens in new window)
  • Click to share on Twitter (Opens in new window)
  • More
  • Click to share on Pocket (Opens in new window)
  • Click to share on Tumblr (Opens in new window)
  • Click to share on Reddit (Opens in new window)
  • Click to share on LinkedIn (Opens in new window)
  • Click to print (Opens in new window)

Save Money with Fetch

Hey everyone! This is Chelsea, Steph’s asistant, back with the simplest app for getting cash back on things you’re already buying! We’ve covered Ibotta, Shopkick, Coupons.com, Swagbucks and we’re all saving hundreds of dollars by now, right? RIGHT!? I’m really hoping you guys have jumped on the rebate app savings train because it’s just so […]

Share this:

  • Click to share on Facebook (Opens in new window)
  • Click to share on Pinterest (Opens in new window)
  • Click to share on Twitter (Opens in new window)
  • More
  • Click to share on Pocket (Opens in new window)
  • Click to share on Tumblr (Opens in new window)
  • Click to share on Reddit (Opens in new window)
  • Click to share on LinkedIn (Opens in new window)
  • Click to print (Opens in new window)

Splendid Spoon Review

I was excited to receive a box of products to try from Splendid Spoon this summer! They invited me to try their line of plant-based, ready-to-eat foods and delivered them right to my door. Check one in the pro column for convenience. I did receive these products free of charge in order to rate them […]

Share this:

  • Click to share on Facebook (Opens in new window)
  • Click to share on Pinterest (Opens in new window)
  • Click to share on Twitter (Opens in new window)
  • More
  • Click to share on Pocket (Opens in new window)
  • Click to share on Tumblr (Opens in new window)
  • Click to share on Reddit (Opens in new window)
  • Click to share on LinkedIn (Opens in new window)
  • Click to print (Opens in new window)

My Networks

#BlogHer15: Experts Among Us Voices of the Year Honoree