Binkies and Briefcases

SUBSCRIBE

  • About
    • Work With Me!
      • Blog & Small Business Consulting
    • Disclosures
  • Popular Posts
  • Adoption & Special Needs
  • Saving Money
  • Recipes
    • Breads
    • Breakfasts
    • Sides
    • Soups
    • Entrées
    • Desserts
  • For the Home
    • For the Home
    • Beauty
    • Crafts
      • For Kids
  • My Books

Handprints

August 19, 2010 By: Stephanie3 Comments

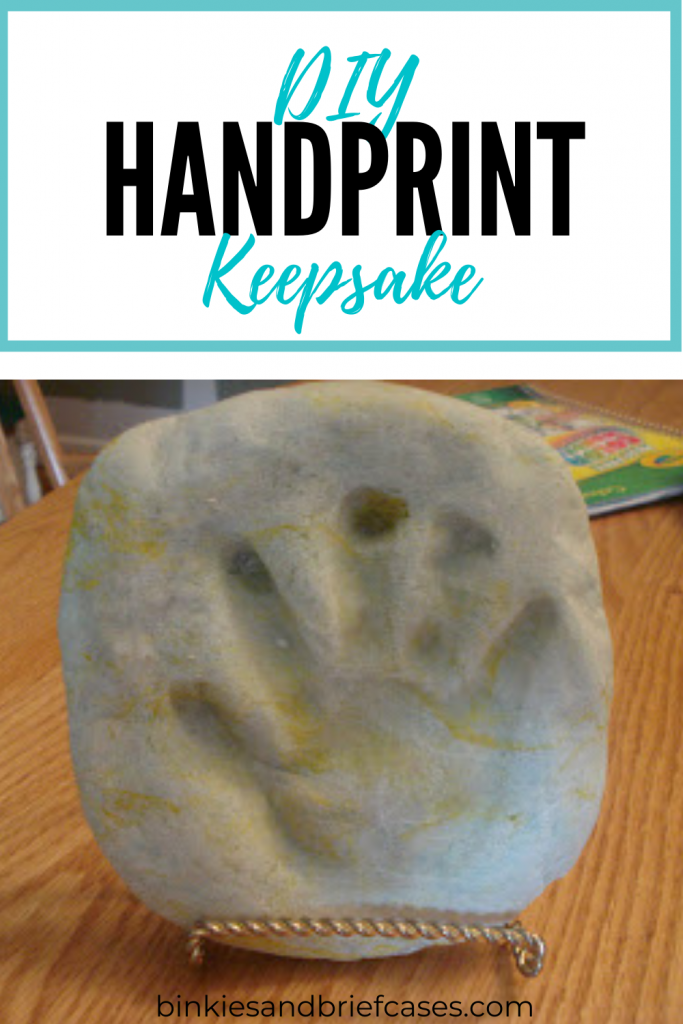
I loved this idea when I saw it on Fun on a Dime! Had to try it right away.

I’ve made homemade play dough out of flour & water dozens of times, but it never occurred to me to let it harden on purpose.

DIY Handprint Keepsake

All you need to do is mix the following:

  • 2 cups of flour
  • 1/2 cup of salt
  • 3/4 cup warm water
  • Add food coloring if desired.
  • Bake at 325 for 30-40 minutes.
 

It will form a dough that you can use as play dough OR you can press little hands or feet into it to make keepsakes like these. Love them.

The mom from Fun on a Dime was brave and let her kids paint theirs. We just left ours as they were straight out of the oven.

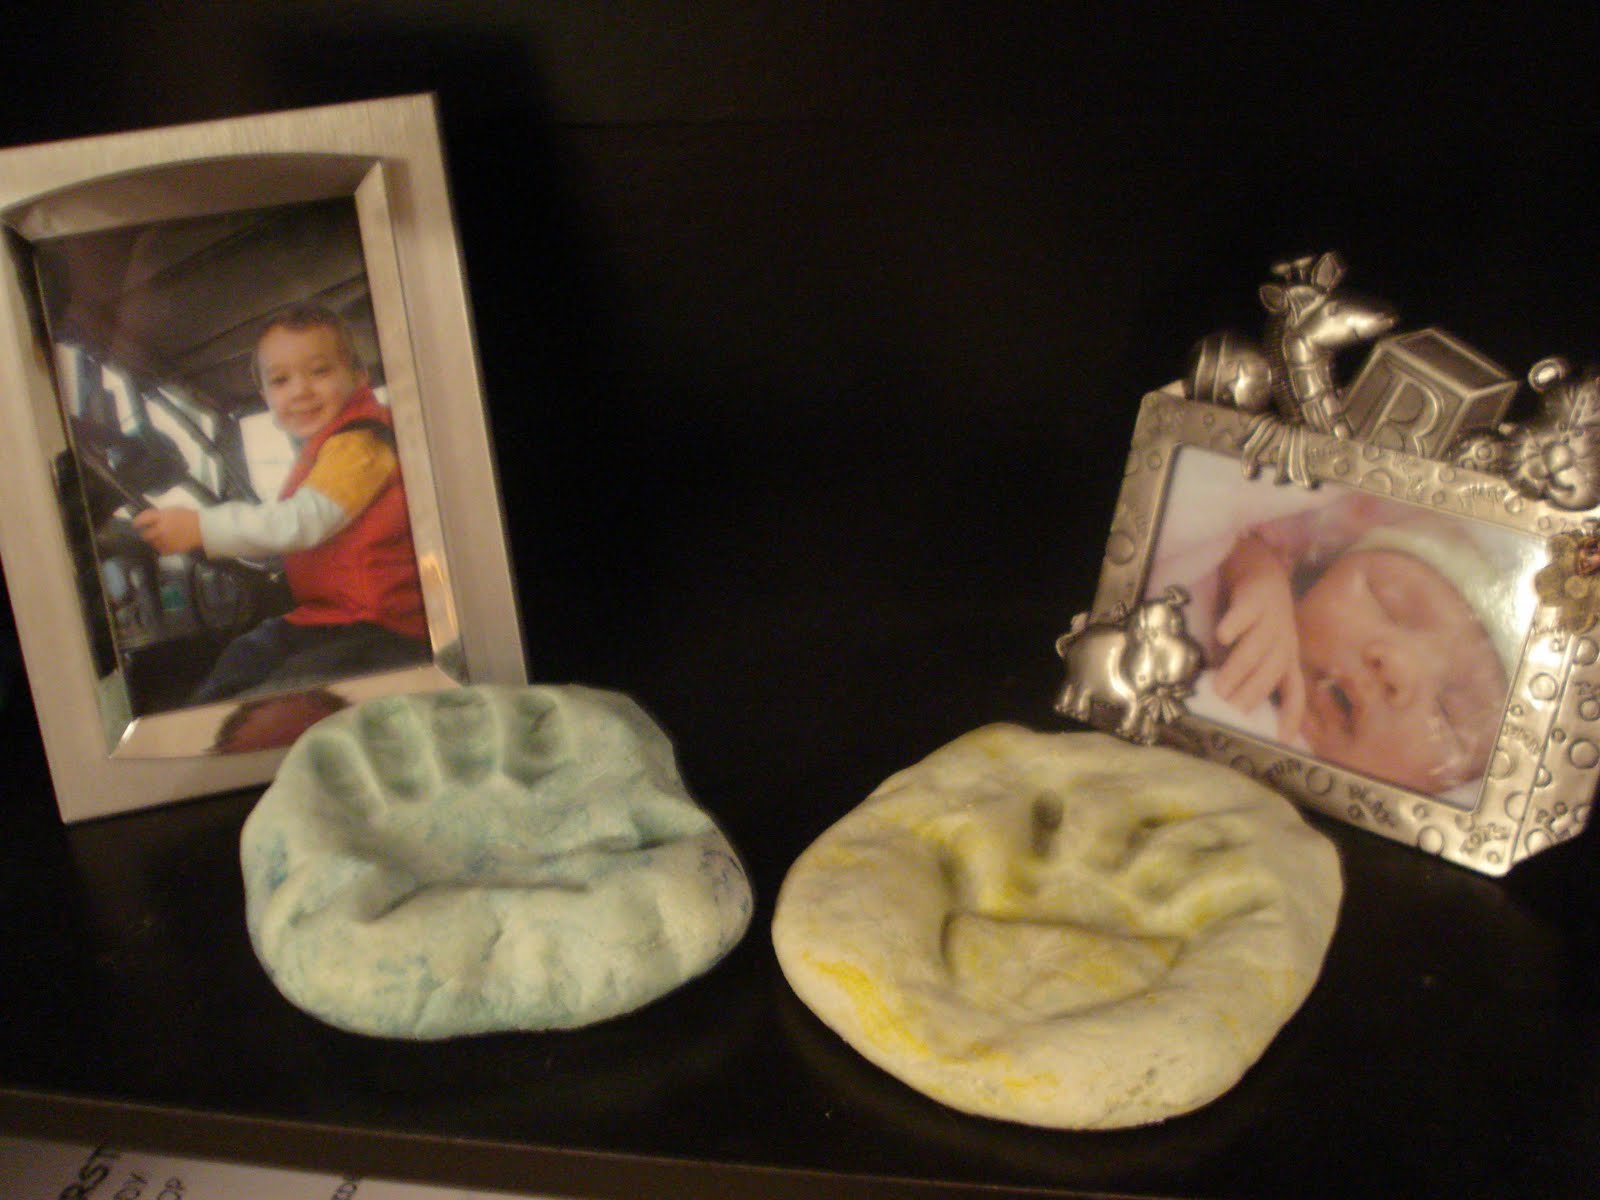
So cute displayed on plate holders in little vignettes. Wouldn’t these make great gifts for grandparents/mother’s day/father’s day? Or use stamps and smaller amounts of dough to create Christmas ornaments. Poke a hole in the top before drying so you can string ribbon through to hang on your Christmas tree.

To make it even more special take a permanent marker and write a poem like this one from this website on the back along with your child’s name & date.

My Handprints
There used to be so many
Of my fingerprints to see
On furniture and walls and things
From sticky, grubby me.

But if you stop and think awhile
You’ll see I’m growing fast
These little moments disappear
You can’t bring back the past.So here is a small reminder
To keep, not throw away
Of tiny hands and how they looked
To make you smile someday.

 
I don’t know how these will hold up over time since they are made out of food products. I’m thinking maybe I should shellac them. Love them!

Share this:

  • Click to share on Facebook (Opens in new window)
  • Click to share on Pinterest (Opens in new window)
  • Click to share on Twitter (Opens in new window)
  • More
  • Click to share on Pocket (Opens in new window)
  • Click to share on Tumblr (Opens in new window)
  • Click to share on Reddit (Opens in new window)
  • Click to share on LinkedIn (Opens in new window)
  • Click to print (Opens in new window)

Once Upon a Swingset

August 19, 2010 By: Stephanie3 Comments

When we chose our current home it was for 2 reasons:
1. We could afford it.
2. This back yard.


Yes, inside there was brown shag carpeting, laminate paneling, and a kitchen that needed to be completely gutted. We had not yet “officially” adopted Nicholas and I wasn’t even pregnant with Abby. It was going to mean a move across 7 states and other major life changes (like giving up my career) but I knew that this back yard would give us moments like these…

Where a brother and a sister can read each other’s minds

and moments of sheer joy are found upon a swing set.

Where a little boy with a troubled past can be the king of his own castle

and a little girl can begin her journey with both hands on the wheel.

Where there is freedom to be nothing but a child.


There are things that have been taken away from my son that as his third mother I might never be able to give him back, but what I can do is try my very best to replace bad feelings with good memories, memories of bare feet, a plastic swing set, and what it feels like to be loved. Forever.
 
So that’s what we will do. One mommy, two babies, and a big back yard.


Weekend Bloggy Reading

Share this:

  • Click to share on Facebook (Opens in new window)
  • Click to share on Pinterest (Opens in new window)
  • Click to share on Twitter (Opens in new window)
  • More
  • Click to share on Pocket (Opens in new window)
  • Click to share on Tumblr (Opens in new window)
  • Click to share on Reddit (Opens in new window)
  • Click to share on LinkedIn (Opens in new window)
  • Click to print (Opens in new window)

Chalkboard & Clip Rail: Part 3

August 18, 2010 By: Stephanie3 Comments

Day 3

The big reveal….Here it is in all its glory.

Make sure that you have completed all of the steps from Part 1 and Part 2.

This is the easy day. All you have left to do is attach picture hangers to the back and hang your pieces on the wall.

Tomorrow prep your chalkboard surface by rubbing the side of a piece of chalk all over it and using a rag to rub all of that chalk in really well. (That’s supposed to make it erasable.) My can said to wait at least 3 full days before doing that.

Yay! A place to help Nicholas learns his letters and numbers and display all of the papers that are going to start coming home from preschool in a few weeks. Does it not look like it came right out of the Pottery Barn catalog? I think it’s worth all $12 I spent. 🙂


Linking up to Whatever Goes Wednesday

giveaways

Build{hers} club Button

Share this:

  • Click to share on Facebook (Opens in new window)
  • Click to share on Pinterest (Opens in new window)
  • Click to share on Twitter (Opens in new window)
  • More
  • Click to share on Pocket (Opens in new window)
  • Click to share on Tumblr (Opens in new window)
  • Click to share on Reddit (Opens in new window)
  • Click to share on LinkedIn (Opens in new window)
  • Click to print (Opens in new window)

Chalkboard & Clip Rail: Part 2

August 18, 2010 By: Stephaniecomment

After completing all of the steps in Part 1 we are ready for day 2!

Day 2 steps:

1. Caulk all of the cracks with paintable caulk. It’s true what they say. This stuff really does hide a multitude of sins! To caulk just squirt the caulk into the crack, wipe off the excess with your finger, and then go back over the surface with a damp rag.

2. After the caulk dries, sand all of the edges again.

3. Put on another coat of paint.

Ok…now we’re going to start on the art rail. I used a 1×3 because we already had one cut to the size I wanted, but you can have Lowes or Home Depot cut the extra piece of furring strip from the frame to whatever length you want yours to be.

4. Sand and paint your long strip of wood. This will be the clip rail.

If you want your pieces to have a painted look then all you have to do is attach clothes pins with glue, let everything dry for another day and then hang it with picture hangers. They are surprisingly light weight pieces.

I made things a little more complicated for myself. Originally, I was just going to antique the cream color with a little stain, but the more I did the more I decided I liked it darker.

To stain:

You will need a rag, gloves, a small paint brush, and the stain. I used Minwax stain & poly all-in-one in Bombay Mahogany.

I like to rub the stain into the surface with a rag and use the brush for smaller areas, like the sides.

Ta-da.

Now do the same thing to the clip rail.

I also decided that I wanted to stain the clothes pins to match. This is way easier than it sounds. Just take the little metal things out, stain one side, and after it dies stain the other side. I used the paint brush for this. When both sides are dry, put the metal piece back in.

Ok, when the clothes pins are finally dry, the last thing you need to do today is use the paint brush to brush some wood glue onto the back of each clothes pin and stick the clothespins into the clip rail.

Stay tuned for the big reveal. 🙂

Share this:

  • Click to share on Facebook (Opens in new window)
  • Click to share on Pinterest (Opens in new window)
  • Click to share on Twitter (Opens in new window)
  • More
  • Click to share on Pocket (Opens in new window)
  • Click to share on Tumblr (Opens in new window)
  • Click to share on Reddit (Opens in new window)
  • Click to share on LinkedIn (Opens in new window)
  • Click to print (Opens in new window)

Chalkboard & Clip Rail: Part 1

August 17, 2010 By: Stephanie2 Comments

Chalkboards are super trendy lately, but my Aunt Charlotte has had chalkboards in her country home for as long as I can remember. They are such a great way to personalize your space. I still love it when we go to visit her and the chalkboard in the kitchen says “Welcome Steph, Eddie, Nick & Abby!”

Now that Nicholas will be starting preschool in a few weeks I wanted one where we could practice writing his letters, his name, shapes, etc. I also wanted a place to be able to display all those craft papers that will start coming home with him.

So I set out to make a matching chalkboard and clip rail, inspired by Knock Off Wood.

Why make my own? Because I like making stuff and I’m cheap. Chalkboards are freakin’ expensive! I don’t know why, but this one from CSN.com is $110.

and these from Pottery Barn are $115 for a set.

That is not happening. I’m making a chalkboard AND a clip rail art display board for a grand total of $12. Disclaimer: that total is because I already had some of the stuff I needed, but even if you had nothing, you could make these for under $30. See:

Materials:

Chalkboard Paint $2.50 (It’s $10 a can, but you will only use about 1/4 of the can)

2’x2′ 1/4″ oak square, under $5 at Lowes.

2 furring strips, under $2 each- $3.75 (ask specifically for furring strips. They are about half the cost of the other boards.) Two is enough for the chalkboard frame and the clip rail.

Paint or stain $5 (You will only need about a pint. You can get oops paint very cheaply.)

Paintable caulk $3

Picture hangers $3

Wood Glue $6

Clothes Pins $1

Rag

Small paint brush (one that you are willing to throw away) & roller

Total: $29.25

And that will leave you with extra caulk, wood glue, paint, and probably some clothes pins for other projects.

Let’s get started!
It’s easy, but it takes a few days because there is a lot of wait time between steps.

Day 1:

1. First I had them cut the wood for me at Lowes to fit around the oak square like a frame. 2 furring strips is enough to frame the square and have plenty left over for the art rail.

2. Then I rolled 3 coats of the chalkboard paint onto the square and let them dry for about an hour.

3. While the chalkboard paint dried I painted the pieces for the frame. Then I waited some more for them to dry.

4. When everything was dry I used Gorilla Wood Glue to secure the pieces of the frame around the sides.

5. Then I stuck some heavy stuff on top like I saw Janell from Isabella and Max Rooms do when she built her message board.

6. Wait 24 hours for the glue to set.

Stay tuned to see my progress. 🙂

Update: Before painting make sure all your surfaces are sanded and wiped clean. Sorry, I forgot to mention that.

Share this:

  • Click to share on Facebook (Opens in new window)
  • Click to share on Pinterest (Opens in new window)
  • Click to share on Twitter (Opens in new window)
  • More
  • Click to share on Pocket (Opens in new window)
  • Click to share on Tumblr (Opens in new window)
  • Click to share on Reddit (Opens in new window)
  • Click to share on LinkedIn (Opens in new window)
  • Click to print (Opens in new window)

When Hubby’s Away

August 16, 2010 By: Stephaniecomment

Eddie left this morning for his 3-month-long business trip. 🙁

In the mean time I’ll be trying to catch up on stuff I’ve been meaning to get done.

So far today I have:

  • taken Nick to play therapy
  • taken Abby to Lowes (during Nick’s appointment)
  • painted the pantry door with chalkboard paint
  • started building a separate chalkboard. (The man at Lowes cut the wood for me)
  • put chalkboard labels on some of my apothecary jars
  • made a new header for my blog (How obvious is it that I don’t know what I’m doing?)

(I also fed and clothed my kids and got them to take naps. Just thought I’d clarify.)

And now I’m taking the kids to work with me this evening. If I can be this productive every day the remodel will be finished before Eddie gets back. Yeah right.

Share this:

  • Click to share on Facebook (Opens in new window)
  • Click to share on Pinterest (Opens in new window)
  • Click to share on Twitter (Opens in new window)
  • More
  • Click to share on Pocket (Opens in new window)
  • Click to share on Tumblr (Opens in new window)
  • Click to share on Reddit (Opens in new window)
  • Click to share on LinkedIn (Opens in new window)
  • Click to print (Opens in new window)

Seashell Keepsake Sign

August 14, 2010 By: Stephaniecomment

We grow great by our dreams sea shell keepsake sign. Perfect nursery decor. What a cute way to save the shells you collect at the beach!

This seashell keepsake sign project cost me 50 cents. I bought an Oops paint sample at Home Depot earlier today.

Remember these 1×3 boards from the garage? Well, Eddie cut another one down for me. Then I painted it with the Oops paint, hot glued on some of the seashells from our beach trip in order from smallest to largest.

and Googled for quotes about growing/dreams/the beach until I found one I liked. The winner: “We grow great by [our] dreams”- President Woodrow Wilson. I just wrote the quote with a Sharpie because I’m impatient.

Voila. Cute little keepsake sign.


I think it has found a home on my kitchen windowsill. It will be much cuter when the beadboard back splash is finally up! (Don’t be surprised if it takes another year before this kitchen is finished.)

 
I think this sign would also be adorable in a nursery, or even a powder room. Let me know if you make one!

You may also like: 
So cute! How to make a miniature book wreath from upcycled materials from around the house
 

Share this:

  • Click to share on Facebook (Opens in new window)
  • Click to share on Pinterest (Opens in new window)
  • Click to share on Twitter (Opens in new window)
  • More
  • Click to share on Pocket (Opens in new window)
  • Click to share on Tumblr (Opens in new window)
  • Click to share on Reddit (Opens in new window)
  • Click to share on LinkedIn (Opens in new window)
  • Click to print (Opens in new window)

Last Hurrah

August 14, 2010 By: Stephaniecomment

In a few days my husband is leaving on a very long business trip.(This is the kind of business trip where you need to buy bear spray and convince federal personnel that 3am is the time of day that your team is least likely to be hit by oncoming traffic.) He’ll be gone a total of about 3 months, although thankfully he’ll be able to come home on and off for a few days throughout. He wanted to go on a family vacation before he left, so we spent the past few days in Ocean City. MD on the same beaches where our families vacationed when we were children.

We are lucky that my parents both own beachfront condos (the view above is from one of the balconies) and Eddie’s parents were able to stay with us and help with the kids. Sometimes we take the beach for granted because we grew up with it, but going with our own children makes us appreciate the traditions much more.

I’m glad Nick & Abby will grow up with memories of the beach

and the boardwalk
(I lovelovelove the antique rides & hand painted walls in the kid’s area!)

and especially fun times with their daddy

We’ll miss you! Stay safe.


Beach Party at Someday Crafts

Share this:

  • Click to share on Facebook (Opens in new window)
  • Click to share on Pinterest (Opens in new window)
  • Click to share on Twitter (Opens in new window)
  • More
  • Click to share on Pocket (Opens in new window)
  • Click to share on Tumblr (Opens in new window)
  • Click to share on Reddit (Opens in new window)
  • Click to share on LinkedIn (Opens in new window)
  • Click to print (Opens in new window)

One of Those Days

August 10, 2010 By: Stephaniecomment

It’s just one of those “Mom I can’t believe you make us eat vegetables.” kind of days. (Actually, there have been no vegetables involved because lunch was from Chik-Fil-A) Hubby woke up with a terrible migraine, had to do some conference calls from home while I attempted (to no avail) to keep the kiddos quiet.

Bad parenting day

Abby was fussy for 4 hours straight and refused to nap although it was obvious that the reason she was fussy was because she woke up entirely too early-and woke everyone else up along with her. Eddie left around for work 10 and I’ve been staring at faces like these ever since.

Navigated through Target with a screaming 1-year-old and a 3-year-old who insisted on walking like a big boy, which apparently also includes hiding in the empty space on the bottom shelf behind several boxes of diapers while mom is loading the cart. (Good thing I saw his little sandal poking out, I can just see myself frantically telling the sales associate that my son has been kidnapped.)

Came home to realize that a certain little monkey had put a pair of shorts in the cart that are 3 sizes too big for his sister and cost way more than I would have spent on them. Didn’t realize I had paid for them because I was busy dealing with the fact that he was literally rolling on the floor in temper tantrum mode while we were checking out.

Yup, that’s my son. The same one who gave me the lovely scab I am now sporting on my right breast because he decided the other day that he was going to hug me and then changed his mind mid-hug and tried to bite my nipple off. Literally. Yes, that was me in Target with one screaming child in the cart, one rolling on the floor yelling and trying to kick me, sporting bite marks, sweatpants, and unbrushed hair while carrying a badge in my purse that qualifies me as a “parenting specialist.”

Later, during lunch little man painted his brand new sunglasses with ketchup and then informed me, while I was washing his glasses and obviously exasperated, “Mom, ketchup is a food for painting things. I painted my sunglasses. Now can I paint my french fries?” at least I could laugh at that one.

Sigh. I am so NOT looking forward to next week when my husband leaves for three straight weeks on a business trip. It’s a good darn thing we are leaving tonight for a mini vacation. I’ll be the one sitting on the beach in a straight jacket.


Update: Less than 5 minutes after posting this my bare-bottomed son was chasing his sister around the kitchen screaming “Give me back my pants!” Welcome to the bell jar.

Share this:

  • Click to share on Facebook (Opens in new window)
  • Click to share on Pinterest (Opens in new window)
  • Click to share on Twitter (Opens in new window)
  • More
  • Click to share on Pocket (Opens in new window)
  • Click to share on Tumblr (Opens in new window)
  • Click to share on Reddit (Opens in new window)
  • Click to share on LinkedIn (Opens in new window)
  • Click to print (Opens in new window)

How to Organize a Kid-Friendly Pantry

August 9, 2010 By: Stephanie1 Comment

How to organize your small pantry with a kid-friendly system. I never thought about baskets being hard to clean!

My 3-year-old recently figured out how to open our pantry door, which led to a scary incident where I found him carrying a bottle of maple syrup around the living room and a bunch of plastic grocery store bags on the kitchen floor where my 1-year-old could get them. That could have been a disaster! Also, now that I am starting to work a few more hours there are other family members here with the kiddos more often and I wanted to make it easier for them to find what they needed for snacks & dinner time.

how to organize a kid-friendly pantry

I search blogland for some ideas for getting the pantry organized, but most of them involved glass jars, baskets that couldn’t easily been seen into or sanitized, and other ideas that just didn’t seem all that practical for my everyday life with two toddlers, so I fell back on the way that I used to organize areas in my elementary school classroom.

And now our pantry looks like this (Sorry, I forgot to take a before picture, but it was a big ol’ mess)

Organizing your pantry

I already had these plastic bins because I just about bought out Target when they had them on sale for $2 each.

I took inventory of what we had in the pantry, threw out anything that was expired, and divided everything into these groups:

  • Paper & Plastic Ware
  • Snacks
  • Pasta & Sauces
  • Drinks
  • Cans & Jars
  • Baking Supplies
  • Breakfast Foods
  • Miscellaneous

I put the paper & plastic ware on the top shelf because we don’t use it that often. I divided it into three separate bins: Napkins & Straws, Utensils (which I grouped into plastic bags according to type & the mount I would need for a small party), and Plates, Bowls, & Cups (which have a large bin)

I chose to put the snacks out of reach so that my little ones can’t reach in and grab a cookie whenever they want one, but for older children I would put it on the bottom shelf for easier access.

You could also add pictures to the bins to make it easier for kids to find what they need.

Boxes of pasta & jars of sauce have their own bin and next to that I left an open space for drink mixes or bottles of unopened soda or juice.

There is an area for cans & jars-syrup in the back!- and a large plastic bin for my baking supplies. I like the idea of the plastic bins to deter little critters (we sometimes have ant issues) from climbing into open packages of flour, etc.

The bottom shelf is for Breakfast foods so that my kids can see their choices in the morning and I left a space for miscellaneous items that didn’t seem to fit in my other categories or were too tall for the shelf where they would otherwise belong.

There are labels on the bins and also on the shelf itself to identify each section. My husband was thrilled that he could find what he wanted and even commented that it would be so much easier to put away groceries. I think it’s important to label both the bin and the shelf so that if someone takes a few bins out to make dinner then they can be sure to put them back in the correct spot.

I also have a plastic bag holder that I picked up at a little country store, but you can make one out of an old dish towel using this tutorial.

I plan to use chalkboard paint to create a chalkboard on the back of my pantry door (which is one of the cool ideas I found on blogland) but if you are renting or if you are more practical then you can just mount a clipboard on a nail inside the pantry with some paper for jotting down your store list. (That way you don’t have to re-write your list from the chalkboard.) Personally, I think the chalkboard will be a fun way to teach the kids how to write their letters and a cute and unexpected surprise for people who open the pantry.

Happy organizing!

You might also like:
10 Reasons to consider keeping your land line

Share this:

  • Click to share on Facebook (Opens in new window)
  • Click to share on Pinterest (Opens in new window)
  • Click to share on Twitter (Opens in new window)
  • More
  • Click to share on Pocket (Opens in new window)
  • Click to share on Tumblr (Opens in new window)
  • Click to share on Reddit (Opens in new window)
  • Click to share on LinkedIn (Opens in new window)
  • Click to print (Opens in new window)
  • « Previous Page
  • 1
  • …
  • 73
  • 74
  • 75
  • 76
  • 77
  • …
  • 80
  • Next Page »
  • Facebook
  • Instagram
  • Pinterest
  • RSS
  • Twitter

Welcome! I’m Steph.

This is a little corner of the internet we like to fill with honesty, heart, and humor. Read More…

Cover for Binkies and Briefcases with Stephanie Giese
19,226
Binkies and Briefcases with Stephanie Giese

Binkies and Briefcases with Stephanie Giese

Stephanie Giese is an indie author based in Florida. She writes stories about realistic problems with humor, heart, and sass. Her work has a strong focus on mental health and consent. Her North Bay small-town romance series is set for release in 2025.

Binkies and Briefcases with Stephanie Giese

3 months ago

Binkies and Briefcases with Stephanie Giese
I know it’s a small thing, but I believe small things can add up to big changes. my entire North Bay series, including Out of Left Field, Right as Rain, and Way Off Base, is free on Kindle from Jan. 30-Feb. 3. Please take the funds you might have spent on my books this week and reallocate them toward the areas in our country that need them the most. Follow creators like Dad Chats who can direct you toward practical needs local to them. I hope my quirky romcoms can bring you some comfort and joy during difficult times, and I hope together we can take small, practical steps toward big changes. ... See MoreSee Less

Photo

View on Facebook
· Share

Share on Facebook Share on Twitter Share on Linked In Share by Email

Binkies and Briefcases with Stephanie Giese

3 months ago

Binkies and Briefcases with Stephanie Giese
I know there is an overall feeling of helplessness in our country right now. So many of us are at a loss for what to do beyond making phone calls and social media posts (which are still important, but can feel like not enough). I believe strongly in the power of small things adding up to big ones. As one person, I might not be able to do much, but what I CAN do is use my voice and my books to work toward the change I’d like to see. That’s why, for the next five days, from Jan. 30-Feb 3, I’m making the Kindle versions of my entire North Bay series (Out of Left Field, Right as Rain, and Way Off Base) completely free. Art has power, and I do hope these comedies can bring you some comfort and joy in difficult times, but most importantly, I also hope you’ll consider redirecting the funds you might’ve spent on my books and donating instead to one of the many charities working tirelessly in our cities right now. If you are located in an area like Minnesota or Portland, please use the space below to make people aware of the organizations in your area that need help. ... See MoreSee Less
View on Facebook
· Share

Share on Facebook Share on Twitter Share on Linked In Share by Email

Reader’s Choice

Image HTML map generator

Follow Me on Pinterest

featured-on

What You’re Saying

  • 28 Best Stone Fireplace Ideas And Designs - Perfect Decor Place on DIY Stone Fireplace with AirStone
  • Kevin Hicks on How to Budget for Building Your Own Home
  • Amy on DIY Stone Fireplace with AirStone
  • Gendered clothing - GenderEd on A Target Intervention on Behalf of My Daughters
  • Wellshop Store on Dressing Our Daughters: How Target Responded to My Last Blog Post

Latest Posts

ALL I Never Knowed: The Book Is Here!

If you’re new here, you may want to subscribe to my Email Newsletter. Thanks for visiting!Welcome back! Be sure to check out my Email Newsletter. Thanks for visiting!It’s finally here, in my hands. It has been a loooong time in the making, but our book, All I Never Knowed: Mental Illness, a Mother’s Love, and […]

Share this:

  • Click to share on Facebook (Opens in new window)
  • Click to share on Pinterest (Opens in new window)
  • Click to share on Twitter (Opens in new window)
  • More
  • Click to share on Pocket (Opens in new window)
  • Click to share on Tumblr (Opens in new window)
  • Click to share on Reddit (Opens in new window)
  • Click to share on LinkedIn (Opens in new window)
  • Click to print (Opens in new window)

Save Money with Fetch

Hey everyone! This is Chelsea, Steph’s asistant, back with the simplest app for getting cash back on things you’re already buying! We’ve covered Ibotta, Shopkick, Coupons.com, Swagbucks and we’re all saving hundreds of dollars by now, right? RIGHT!? I’m really hoping you guys have jumped on the rebate app savings train because it’s just so […]

Share this:

  • Click to share on Facebook (Opens in new window)
  • Click to share on Pinterest (Opens in new window)
  • Click to share on Twitter (Opens in new window)
  • More
  • Click to share on Pocket (Opens in new window)
  • Click to share on Tumblr (Opens in new window)
  • Click to share on Reddit (Opens in new window)
  • Click to share on LinkedIn (Opens in new window)
  • Click to print (Opens in new window)

Splendid Spoon Review

I was excited to receive a box of products to try from Splendid Spoon this summer! They invited me to try their line of plant-based, ready-to-eat foods and delivered them right to my door. Check one in the pro column for convenience. I did receive these products free of charge in order to rate them […]

Share this:

  • Click to share on Facebook (Opens in new window)
  • Click to share on Pinterest (Opens in new window)
  • Click to share on Twitter (Opens in new window)
  • More
  • Click to share on Pocket (Opens in new window)
  • Click to share on Tumblr (Opens in new window)
  • Click to share on Reddit (Opens in new window)
  • Click to share on LinkedIn (Opens in new window)
  • Click to print (Opens in new window)

My Networks

#BlogHer15: Experts Among Us Voices of the Year Honoree