Binkies and Briefcases

SUBSCRIBE

  • About
    • Work With Me!
      • Blog & Small Business Consulting
    • Disclosures
  • Popular Posts
  • Adoption & Special Needs
  • Saving Money
  • Recipes
    • Breads
    • Breakfasts
    • Sides
    • Soups
    • Entrées
    • Desserts
  • For the Home
    • For the Home
    • Beauty
    • Crafts
      • For Kids
  • My Books

Closet Barn Door Tutorial Day 1

April 6, 2011 By: Stephanie2 Comments

It’s been quite a journey today, but it was just one of those days where I woke up with a vision and I just wasn’t going to be able to concentrate on anything but bringing it to life. So after two trips to Lowes, destroying our dining room table (luckily we are planning to refinish it anyway), and a non-building related injury I at least can say we have a new set of custom, hand-crafted closet doors. The finish will have to wait until tomorrow.

A normal person would probably be concentrating on planning a birthday party, cleaning the house, and trying to keep a low profile while her husband studies for the most important test of his life.

I think we’ve already established that I’m out of my mind, though.

So I decided I was going to design and build some closet doors today. From scratch.

Nevermind that I don’t have any idea what I’m doing. We can figure it out, right? (By “we” I mean me and a four-year-old and a not-quite-two-year-old. )

I saw these doors at Cheri’s house a while ago and I fell in love.

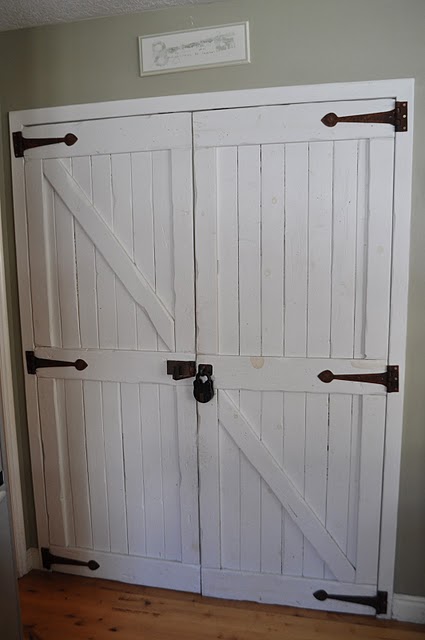
I set off to make a sliding version to replace Abby’s closet doors. Our current doors are ugly, hallow, and old, not to mention that they have no character. I want to replace them, but Abby’s room still needs sliding doors because her closet is too close to the main door to replace it with doors that swing out or bi-folds. The closet doors would hit the other door and also take up extra space in her already small room. So sliders it is. I’ve been racking my brain trying to think of ways to re-do the existing ones (beadboard wallpaper? faux painting?) but I knew I wasn’t going to be happy with the end results, and when I priced beadboard paper it was cheaper to build new ones from scratch. So that’s what I’m doing.

Besides, Pottery Barn likes sliding barn doors too, see? Really wishing I knew how to miter corners now…

Also, I’m not great at math and I can’t use Sketchup or any other fancy pants mathy software, so it’s going to be interesting.

I can use Paint, though. (Yeah, I drew this in Paint like a 6th grader. No laughing.)


My plan is to use pine furring strips because they are thin enough to fit two thick on our existing track, they will give me the look I want in solid wood but still be lightweight enough, and they are cheap. Each door should cost under $25 in lumber.

I’m going to attempt to give you these plans Ana White style:

Shopping list (for ONE door)
20 8 ft long 1″x2″ furring strips
Wood glue
1 inch nails or screws
Paint or stain

Cut List (for ONE door):
(16) 80″ pieces- slats in back
(2) 24″ pieces- top & bottom trim
(2) 77″ pieces- side trim
(1) 21″ piece-middle trim

These measurements are for a standard 24 x 80 inch closet door. They should fit a standard sliding track, in theory. I measured our track a million times & I’m 90% sure they are going to fit, but I haven’t gotten to that stage yet. I’ll be sure to post an update when I do. For now I’m just really excited to share my progress with you. Make sure to measure your closet as well as the depth of your existing doors to see if you need to make any adjustments.

So far, I have both doors built, but it is very hard to get them perfectly square because of the warped nature of the furring strips. I’m not quite sure how they will look once they are hung. I’m hoping it will add to their charm. That’s why we make things look rustic, right?

I really hope my directions make sense.

Instructions:
1. Lay out all 16 of your 80″ strips on a level surface.
2. Glue each piece to the one next to it.
3. Glue and screw or nail (from the back so you won’t have to fill in any holes) one 24″ piece across the top and one across the bottom.
4. Glue & screw one 77″ piece on the left side and one on the right, directly on top of the 80″ pieces.
5. Place your 21″ piece across the middle where ever your little heart desires and attach it to each slat.

I don’t know how to miter corners, but if you do, you could try adding a fancy diagonal board like you see on Cheri’s door & the PB picture.

Wait for the glue to dry, then fill any holes you can see from the front, prime & paint.

Attach it to a standard track.

Make sure you are following all necessary safety precautions.

I managed to get the doors built today, despite the fiascoes of drilling several pin holes into my dining room table and twisting my ankle on my way out the door to pick up Nick from preschool, which led to falling down our concrete steps while holding Abby. (She didn’t get hurt.)

Tomorrow is another day, so hopefully these babies will get primed, painted & hung.

Hopefully these closeups give you a better idea of how I put them together.

Transformation Thursday

Share this:

  • Click to share on Facebook (Opens in new window)
  • Click to share on Pinterest (Opens in new window)
  • Click to share on Twitter (Opens in new window)
  • More
  • Click to share on Pocket (Opens in new window)
  • Click to share on Tumblr (Opens in new window)
  • Click to share on Reddit (Opens in new window)
  • Click to share on LinkedIn (Opens in new window)
  • Click to print (Opens in new window)

Ballards Handprint Knock-Off

February 24, 2011 By: Stephanie4 Comments

When I saw this picture on the Ballard’s Design website, I had this conversation with myself:
Why would anyone ever pay $89 a piece for those? I could make them for free. But why would I want to? …Actually, I bet those gloves would make a cute handprint keepsake.

Guess what? I was right. (It happens occasionally.) I can make those for free & it did turn out to be a cute keepsake.

I didn’t want to use just any old newspaper, I wanted it to have some sort of meaning (plus we didn’t have any newspaper, anyway) so I Googled former First Lady Abigail Adams, the namesake for my Abby, and printed off a few paragraphs in a very small print.

I brewed some tea and just dabbed the tea bag onto the paper to get the color I wanted. Then I scrunched up the wet paper & unscrunched it very carefully. When I was happy with the scrunchiness I let it dry for a while. Abby, who is not quite two yet, actually helped with this part, so it’s a really easy activity to do with kids.

Here’s a before & after:

Then I came back with a Sharpie & traced a cut-out of my daughter’s hand. (I made a cut out ahead of time in case she wriggled around and made it hard for me not to mess up on the tea stained paper.) I added a few other details with the Sharpie too.

I just used a glue stick to stick them to a piece of white paper & stuck them in a frame we already had. I think they would make really cute, easy, (and cheap) Mother’s day gifts.

Share this:

  • Click to share on Facebook (Opens in new window)
  • Click to share on Pinterest (Opens in new window)
  • Click to share on Twitter (Opens in new window)
  • More
  • Click to share on Pocket (Opens in new window)
  • Click to share on Tumblr (Opens in new window)
  • Click to share on Reddit (Opens in new window)
  • Click to share on LinkedIn (Opens in new window)
  • Click to print (Opens in new window)

Super Easy Toddler Sundress

February 11, 2011 By: Stephanie1 Comment

We are going to Disney World next month. (Yay!!!) Since it will be March, Florida will be pretty warm, but we will still be getting snow in Pennsylvania. This is a bit of a dilemma…should I buy new summer clothes for Abby to wear just for a few days that she will outgrow by the time PA’s weather gets warm?

How to Sew a Toddler Sundress

Hmm..nope. I think I’ll make some instead. This is the easiest toddler sundress ever.

Just measure your daughter across the chest and cut a piece of an old sweater that width by whatever length you want.

Then cut off the rest of the band at the bottom. We are going to make the straps out of that.

Now you should have 2 pieces that look like this.

Ok. cut the band in half so that you have 2 pieces for the straps.

Turn the sweater around so that the bottom band is now at the top. Sew up the side seem from where you cut the sweater, hem the bottom, and attach the straps. (I also did a zigzag stitch on the side of each strap where I cut the band off of the sweater in order to keep it from unraveling.)

We will probably wear a t-shirt under it when we are in public.

Pulling the fabric through the machine is what creates that little ruffle on the bottom. The harder you pull while you are sewing, the more it will ruffle.

Let me know if you make one!

This isn’t the first time I’ve upcycled an old sweater. Check out my Anthro Sweater Skirt Knock Off here and if you’re new to sewing, click to watch the three videos I made to help you learn about your sewing machine.

Anthropology Sweater Skirt Tutorial

Share this:

  • Click to share on Facebook (Opens in new window)
  • Click to share on Pinterest (Opens in new window)
  • Click to share on Twitter (Opens in new window)
  • More
  • Click to share on Pocket (Opens in new window)
  • Click to share on Tumblr (Opens in new window)
  • Click to share on Reddit (Opens in new window)
  • Click to share on LinkedIn (Opens in new window)
  • Click to print (Opens in new window)

Toddler Backpack for Valentine’s Day & Beyond

February 11, 2011 By: Stephanie2 Comments


You might have noticed that there aren’t a lot of boy-friendly Valentine’s Day activities out there.

I wanted something cute that both Nick & Abby could use, but I’m also too practical to be making a lot of cutesy seasonal stuff. I wanted something they could use year round.

I also really like the owl trend that seems to be everywhere lately. They’re adorable, they represent wisdom, and they are gender neutral. What’s not to love?

So I made this cute little backpack from the free downloadable pattern found here. I used canvas drop cloth & scraps of knit jersey (straps) and felt (owl’s face) that I already had on hand & then I just used a fabric marker to write “Whooo’s got mail?” $0 projects are my favorite. 🙂

I didn’t bother with the interfacing mentioned in the tutorial. I just traced the pattern on the drop cloth, cut out the pieces & sewed them together. You might also notice that my thread choice was not ideal. That’s because I didn’t bother changing the thread in my machine, which was blue. I’m pretty sure my toddlers will get over it, but that’s why I can never have an Etsy shop. I am way too much of a quick & dirty sewer.

It’s very small, but it will be perfect for carrying Valentine’s notes or for pretending to be mail carriers long after Valentine’s Day.

You could also enlarge the pattern and create an easy knock-off of these Pottery Barn Kids backpacks

Share this:

  • Click to share on Facebook (Opens in new window)
  • Click to share on Pinterest (Opens in new window)
  • Click to share on Twitter (Opens in new window)
  • More
  • Click to share on Pocket (Opens in new window)
  • Click to share on Tumblr (Opens in new window)
  • Click to share on Reddit (Opens in new window)
  • Click to share on LinkedIn (Opens in new window)
  • Click to print (Opens in new window)

Kitchen Reveal: Remodeling on a Budget

February 1, 2011 By: Stephanie10 Comments

We are a year and a half into our Craigslist Kitchen Remodel! I can’t believe it took that long, but in the end it will be worth it.

We are finally in the final stages! The back splash is up. All we have to do now is add crown molding and find a stainless steel fridge.

Wanna see?

This is what the kitchen & dining room looked like before…


I actually entered it in a few Ugliest Kitchen In America-type contests. Unfortunately it didn’t win any, so the reno was on us.

Happily, we have been able to completely gut and redo our kitchen AND dining room for under $6,000. Yep. Entirely new cabinets, floors, counters, everything, under 6 grand.

My secret is Craigslist.

I searched for months and finally found decent cabinets & counters for sale. More than decent, actually. The cabinets are solid cherry and have a lot of custom features like pull out spice racks, and sheet pan dividers and the counters are Silestone.

The old owners thought their kitchen was outdated, but some new hardware & getting rid of the wooden scroll window valance really updated it. Their loss, I say.

I found this inspiration photo here. We used it to help us pick our hardware & paint color.
(unfortunately, a solid stone back splash was not in our budget…)

Now our kitchen looks like this…

That’s the island that was just featured on Remodelaholic. We made it from by up-cycling an old ugly dresser.

The back splash is bead board. I would have preferred tile, but we had a huge area to cover and tile was going to be expensive. It was also hard to find a tile that coordinated with our “new” counters.

Here’s what I call the dining room, but this is really all just one big area. We plan to refinish the table when the kids get a little older. (No sense in doing all that work while we have two toddlers who are very hard on the furniture.)

We do plan to add the crown molding within the next few months and my mom has promised us her stainless steel fridge eventually, as she is in the market for a new one. (She currently has a side-by-side, but wants one with french doors & a pull-out freezer.)

Cost break down:
Cabinets, Counters, Sink & Faucet: Craigslist, came as a set for $2,000
Uhaul rental-1day: $100
Hardware: $150
Labor to hang cabinets & install counters and sink, and relocate dishwasher: $1,600
New floor: Home Depot, Allure Vinyl $800
Paint: $50 (Valspar Green Tea Leaf and Brandied Pear)
Lightfixtures: $50 (Lowes & Craigslist)
Island: $315
Beadboard, wainscoting, and floor boards: $500
New window treatments: JC Penny $150
Stove: Free, Craigslist (I bought it for $75, then sold our old one for $80)
Accessories: $0 Tempt-Tations line from QVC, all gifted. My family knows I collect them.
Table and Chairs: $0 hand-me-downs from my dad
Dining Room Shelves: Ana White’s ledges- $40
Sewing Table: $50 Goodwill re-do
Dining Room Bench (not pictured): JC Penny on sale w/promo code: $120

Total: $5,925

We will probably need to spend another $500 or so for the crown molding for the walls and the molding we plan to add to the top of the cabinets, so the total will probably be around $6,500 once all is said and done. That might be a whole other year, so I figured I’d share once we had the back splash finished.

We recently had an architect from the Parade of Homes in our house and he guessed that we had spent $30,000 on the kitchen renovation!

It’s amazing how much more at home you can feel in the same space once you have redone it and claimed it as your own. It’s also a great feeling to get that feeling for the least amount of money possible!

I have a bad habit of searching MLS listings and day dreaming, but I have to say, since we have refinished our kitchen I haven’t been able to find a home in the MLS with similar square footage to ours that has a kitchen I like any better. Even the brand new ones.

That makes me happy. 🙂

Share this:

  • Click to share on Facebook (Opens in new window)
  • Click to share on Pinterest (Opens in new window)
  • Click to share on Twitter (Opens in new window)
  • More
  • Click to share on Pocket (Opens in new window)
  • Click to share on Tumblr (Opens in new window)
  • Click to share on Reddit (Opens in new window)
  • Click to share on LinkedIn (Opens in new window)
  • Click to print (Opens in new window)

How to Make Overalls for Your Toddler from an Old Sweater

November 16, 2010 By: Stephanie10 Comments

How to Make Toddler Overalls from an Old Sweater
Baby Gap is selling these toddler overalls this year.

Which made me think, “I could make those.”

Guess what? It’s not even that hard.

I just traced a pair of overalls Abby already had onto a sweater.

I cut out the front and the back and got two pieces that looked like this.

I sewed the sides and the inseam shut (I was going to do buttons for easier diaper changes, but then I got lazy)

I cut out straps and pockets out of the sleeves and sewed them into place, then I added buttons to the front and finished all of the exposed edges with zigzag stitches.

(If you want to do a size larger than 18 months you will probably need to use a sweater dress instead of a normal sweater for the extra length.)

I love the way they turned out!
Plus they were free. Beat that, Baby Gap.

Don’t forget to enter my Christmas Print Giveaway!

Share this:

  • Click to share on Facebook (Opens in new window)
  • Click to share on Pinterest (Opens in new window)
  • Click to share on Twitter (Opens in new window)
  • More
  • Click to share on Pocket (Opens in new window)
  • Click to share on Tumblr (Opens in new window)
  • Click to share on Reddit (Opens in new window)
  • Click to share on LinkedIn (Opens in new window)
  • Click to print (Opens in new window)

How to Puree a Pumpkin

October 19, 2010 By: Stephanie4 Comments

Learn how to use your microwave to make homemade pumpkin puree out of fresh pumpkins. Just like the kind you buy in a can, but with no preservatives and only one ingredient- pumpkin!
 
From Field to Freezer


We went on a field trip last week to a pumpkin patch.
Nicholas got to take home two pumpkins.
He then proceeded to annoy me for four days by taking the pumpkins down from whatever “out of reach” spot I had put them and throwing them around the house like pumpkin footballs.

The pumpkins had to go.

I was on my way to the trash to throw them out, but that just seemed so wasteful.

So I did some Googling and learned how to puree a pumpkin. Once it’s pureed you can use it in any recipe that calls for pumpkin.

The first thing I learned was that the pumpkins are supposed to be small if you are going to use them for cooking. Apparently large pumpkins are just for decoration and don’t taste that great.
That was fine by me, our pumpkins were little anyway. The other thing I learned is that all pumpkins are edible. That was a big relief, because I didn’t know what kind of pumpkins these were and I was kind of worried about inadvertently poisoning my family.

how to puree a pumpkin with the help of your microwave

First cut the top off the pumpkin and then cut the rest into sections using a serrated bread knife.

how to puree a pumpkin

Scoop out the seeds and stringy pulp stuff.
Rinse off the seeds and set those aside.

learn how to puree pumpkins

Put the pumpkin pieces in a microwavable bowl. Add about a cup of water.

pumpkin seeds

Dry the seeds on paper towels, then put them on a cookie sheet lined with aluminum foil. If you want to roast the seeds, salt them and then bake at 375 for about 12 minutes. 

homemade pumpkin puree

Microwave the pumpkin for about 20 minutes. Check it after 15 minutes and rotate the pieces to make sure they are cooking evenly. When it is soft like a cooked sweet potato it’s finished.

Scrape the cooked flesh away from the skin. (There’s a gross Halloween visual)

The tutorials I read said to put it in the food processor or blender to puree it, but I found it worked just fine to smash it really well with a fork. (Who needs all those extra dirty dishes?)

If you’re not going to use it right away store it in a freezer bag & then freeze it. You might want to double bag it for extra security against freezer burn. 

Google says you cannot can homemade pumpkin.
I always listen to Google.

It will be pretty cool to make a pumpkin pie for Thanksgiving out of a pumpkin we actually picked straight from the field, though.

Want to see how I made the hat Nick is wearing on our trip to the orchard? You might also want to check out: 

How to make adorable pumpkin sweater hats in less than ten minutes out of upcycled sweaters

Share this:

  • Click to share on Facebook (Opens in new window)
  • Click to share on Pinterest (Opens in new window)
  • Click to share on Twitter (Opens in new window)
  • More
  • Click to share on Pocket (Opens in new window)
  • Click to share on Tumblr (Opens in new window)
  • Click to share on Reddit (Opens in new window)
  • Click to share on LinkedIn (Opens in new window)
  • Click to print (Opens in new window)

7 Ways to Fake a Clean House

August 28, 2010 By: Stephanie5 Comments

Are you ready to fake it? (A clean house, that is…)

7 ways to fake a clean house

My in-laws have taken the kids for the weekend!!! Woo-hoo. I am excited to get some projects done, spend this evening with friends, and give the house the thorough cleaning it so desperately needs.

I should preface this by saying that I used to be a clean freak. The first year we got married Edie and I would spend about 3 hours every Sunday afternoon cleaning the house from top to bottom, even if it didn’t need it. Windows, baseboards, everything. Now that we are parents we do not have the luxury of time to do those types of cleanings. (Plus we realize they were a little overboard.) Sadly, I can no longer live up to my old standard of clean most of the time.

As I was cleaning the kitchen for real this morning I laughed to myself about all of the times I have had to “fake clean” my house. Every week since January Nicholas has had two Early Intervention appointments in our home. I would always do a quick fake-out before one of his teachers came over. I also usually do it if we are having a last-minute play date or if we decide to invite friends over to watch a movie or play board games after the kids go to sleep.

So here are my tips for achieving a “fake clean” house in about 10 minutes:

You will need these:

I am not endorsing any of these particular brands, they just happen to be brands we have in our home.

1. Put dirty dishes in the dishwasher, but don’t turn it on if someone is coming over soon- it’s noisy and having a clean sink and no running dishwasher gives the impression that you keep your sink clean (which I am totally guilty of not doing, like, AT ALL)

2. Wipe down the counters in the kitchen and main bathroom with baby wipes. Baby wipes are cheaper than disinfecting wipes like Lysol and Clorox and they don’t leave a chemical smell that says “I just cleaned up because you were coming over” (of course my house always smells like diapers anyway, so I doubt anyone would be able to tell the difference)

3. Squirt toothpaste in the toilet and swirl it around with the toilet brush. I know this sounds bizarre, but toothpaste is made for cleaning the enamel on your teeth and your porcelain toilet isn’t that much different. Plus, again it does not leave a chemical smell, just the impression that you keep your bathroom clean like that all the time. (which of course I totally do. um, not.)

Crazy toilet cleaning trick that works! Great for just before guests come over.

4. Throw any other clutter that is in the bathroom (potty chair, step stool, bath toys, etc) into the tub and pull the shower curtain closed

5. Close all of the bedroom doors.

6. Throw the toys that have scattered all over the living room into a plastic bin.

7. Spray Febreze or Oust.

If I have time I also wipe down the bathroom mirror and the living room window. If I have time. I usually do not.

Mostly it just makes me feel better to give the impression that I am capable of keeping the house clean while two toddlers are living in it. I’m not. But at least by giving the illusion of a clean house my son’s teachers and therapists won’t be able to blame his issues on his environment (not that they would) and our friends don’t have to see the clutter and curdled milk in sippy cups that have become our reality.

Share this:

  • Click to share on Facebook (Opens in new window)
  • Click to share on Pinterest (Opens in new window)
  • Click to share on Twitter (Opens in new window)
  • More
  • Click to share on Pocket (Opens in new window)
  • Click to share on Tumblr (Opens in new window)
  • Click to share on Reddit (Opens in new window)
  • Click to share on LinkedIn (Opens in new window)
  • Click to print (Opens in new window)

How to Make Puppets for Kids from An Old Sweater

July 28, 2010 By: Stephanie15 Comments

How to make puppets for kids out of the sleeves from your old sweaters.

Meet sweater puppets. They’re like a chic, stylish cousin to the sock puppet and pretty much just as easy. Plus, once again, I got a no-spend Christmas present for the kids out of this project. I am tempted to go all out and do a completely no-spend Christmas, but that would mean putting some of the things I am most excited to try (felt steamed crabs!) on the back burner….we shall see.

Anyway, I got this idea from this tutorial and I just had to try it since I already had the stuff to make it around my house.

Once you start making these you will be addicted! Each one only took about 20 minutes.

How to Make Puppets for Kids from an Old Sweater: 

I started with an old sweater dress that had a hole in it and one of Abby’s baby blankets (ok, it’s actually a spit-up rag) My sweater was more than 60% cotton, so I skipped the felting step and just left it as-is. (Only 100% wool will felt)

Cut off the sleeves (You only need one sleeve for each puppet)

Turn it inside out, straight stitch over the hole you just made by cutting the sleeve off, and leave the other end open. Turn it back right side out.

Cut two little round pieces from another part of the sweater. These will be the ears. The only difference between my puppet and the tutorial is that because I didn’t felt the sweater I had to stitch around the edge of the ears so they wouldn’t unravel.

Sew the ears to the top of the head. Make sure to use a matching thread because this seam is visible.

Finally, cut some circles out of contrasting fabric. This is where the baby blanket came in. I cut out the polka dots. You will need one circle for the nose and two for the eyes.

Hand stitch the circles in place. After this step, I also took a Sharpie and added pupils. It was so cute and easy I had to make two!

They started out intended to be mice, but I think they look more like wolves. I think I might just need to get my hands on some pink sweaters and make each big bad wolf a set of three little pigs to go with it.

They’ve even made the November TOP 10 in Iron Crafter! Click here to vote for them:

And, as always, I like to see how much money I saved by making them myself out of stuff I already had.

Rosie Hippo charges $49 for their set of 3, and Land of Nod charges almost $22 each for theirs. I think I’ll keep my free ones, thanks.

That means thus far I have saved $78 in two days since I didn’t pay $34 for a Pottery Barn rag doll or $44 for two Land of Nod puppets. Not too shabby.


Share this:

  • Click to share on Facebook (Opens in new window)
  • Click to share on Pinterest (Opens in new window)
  • Click to share on Twitter (Opens in new window)
  • More
  • Click to share on Pocket (Opens in new window)
  • Click to share on Tumblr (Opens in new window)
  • Click to share on Reddit (Opens in new window)
  • Click to share on LinkedIn (Opens in new window)
  • Click to print (Opens in new window)
  • « Previous Page
  • 1
  • 2
  • 3
  • Facebook
  • Instagram
  • Pinterest
  • RSS
  • Twitter

Welcome! I’m Steph.

This is a little corner of the internet we like to fill with honesty, heart, and humor. Read More…

Cover for Binkies and Briefcases with Stephanie Giese
19,205
Binkies and Briefcases with Stephanie Giese

Binkies and Briefcases with Stephanie Giese

Stephanie Giese is an indie author based in Florida. She writes stories about realistic problems with humor, heart, and sass. Her work has a strong focus on mental health and consent. Her North Bay small-town romance series is set for release in 2025.

Binkies and Briefcases with Stephanie Giese

4 months ago

Binkies and Briefcases with Stephanie Giese
I know it’s a small thing, but I believe small things can add up to big changes. my entire North Bay series, including Out of Left Field, Right as Rain, and Way Off Base, is free on Kindle from Jan. 30-Feb. 3. Please take the funds you might have spent on my books this week and reallocate them toward the areas in our country that need them the most. Follow creators like Dad Chats who can direct you toward practical needs local to them. I hope my quirky romcoms can bring you some comfort and joy during difficult times, and I hope together we can take small, practical steps toward big changes. ... See MoreSee Less

Photo

View on Facebook
· Share

Share on Facebook Share on Twitter Share on Linked In Share by Email

Binkies and Briefcases with Stephanie Giese

4 months ago

Binkies and Briefcases with Stephanie Giese
I know there is an overall feeling of helplessness in our country right now. So many of us are at a loss for what to do beyond making phone calls and social media posts (which are still important, but can feel like not enough). I believe strongly in the power of small things adding up to big ones. As one person, I might not be able to do much, but what I CAN do is use my voice and my books to work toward the change I’d like to see. That’s why, for the next five days, from Jan. 30-Feb 3, I’m making the Kindle versions of my entire North Bay series (Out of Left Field, Right as Rain, and Way Off Base) completely free. Art has power, and I do hope these comedies can bring you some comfort and joy in difficult times, but most importantly, I also hope you’ll consider redirecting the funds you might’ve spent on my books and donating instead to one of the many charities working tirelessly in our cities right now. If you are located in an area like Minnesota or Portland, please use the space below to make people aware of the organizations in your area that need help. ... See MoreSee Less
View on Facebook
· Share

Share on Facebook Share on Twitter Share on Linked In Share by Email

Reader’s Choice

Image HTML map generator

Follow Me on Pinterest

featured-on

What You’re Saying

  • 28 Best Stone Fireplace Ideas And Designs - Perfect Decor Place on DIY Stone Fireplace with AirStone
  • Kevin Hicks on How to Budget for Building Your Own Home
  • Amy on DIY Stone Fireplace with AirStone
  • Gendered clothing - GenderEd on A Target Intervention on Behalf of My Daughters
  • Wellshop Store on Dressing Our Daughters: How Target Responded to My Last Blog Post

Latest Posts

ALL I Never Knowed: The Book Is Here!

If you’re new here, you may want to subscribe to my Email Newsletter. Thanks for visiting!Welcome back! Be sure to check out my Email Newsletter. Thanks for visiting!It’s finally here, in my hands. It has been a loooong time in the making, but our book, All I Never Knowed: Mental Illness, a Mother’s Love, and […]

Share this:

  • Click to share on Facebook (Opens in new window)
  • Click to share on Pinterest (Opens in new window)
  • Click to share on Twitter (Opens in new window)
  • More
  • Click to share on Pocket (Opens in new window)
  • Click to share on Tumblr (Opens in new window)
  • Click to share on Reddit (Opens in new window)
  • Click to share on LinkedIn (Opens in new window)
  • Click to print (Opens in new window)

Save Money with Fetch

Hey everyone! This is Chelsea, Steph’s asistant, back with the simplest app for getting cash back on things you’re already buying! We’ve covered Ibotta, Shopkick, Coupons.com, Swagbucks and we’re all saving hundreds of dollars by now, right? RIGHT!? I’m really hoping you guys have jumped on the rebate app savings train because it’s just so […]

Share this:

  • Click to share on Facebook (Opens in new window)
  • Click to share on Pinterest (Opens in new window)
  • Click to share on Twitter (Opens in new window)
  • More
  • Click to share on Pocket (Opens in new window)
  • Click to share on Tumblr (Opens in new window)
  • Click to share on Reddit (Opens in new window)
  • Click to share on LinkedIn (Opens in new window)
  • Click to print (Opens in new window)

Splendid Spoon Review

I was excited to receive a box of products to try from Splendid Spoon this summer! They invited me to try their line of plant-based, ready-to-eat foods and delivered them right to my door. Check one in the pro column for convenience. I did receive these products free of charge in order to rate them […]

Share this:

  • Click to share on Facebook (Opens in new window)
  • Click to share on Pinterest (Opens in new window)
  • Click to share on Twitter (Opens in new window)
  • More
  • Click to share on Pocket (Opens in new window)
  • Click to share on Tumblr (Opens in new window)
  • Click to share on Reddit (Opens in new window)
  • Click to share on LinkedIn (Opens in new window)
  • Click to print (Opens in new window)

My Networks

#BlogHer15: Experts Among Us Voices of the Year Honoree