Binkies and Briefcases

SUBSCRIBE

  • About
    • Work With Me!
      • Blog & Small Business Consulting
    • Disclosures
  • Popular Posts
  • Adoption & Special Needs
  • Saving Money
  • Recipes
    • Breads
    • Breakfasts
    • Sides
    • Soups
    • Entrées
    • Desserts
  • For the Home
    • For the Home
    • Beauty
    • Crafts
      • For Kids
  • My Books

Homemade Elsa Costume

July 21, 2014 By: Stephanie5 Comments

homemade Elsa costume from Binkies and Briefcases. #Disney #Elsa #costume

homemade Elsa costume Make an Elsa costume. A quick tutorial from Binkies and Briefcases

Abby has been asking for this Elsa dress for months, but the stores have been sold out. So, when she asked again this morning, I decided to try my hand at a homemade Elsa costume.

I am an intermediate sewer. By that I mean that I know the correct way to do things, although I chose to ignore them, and I do know my way around a sewing machine. I love the creativity process. I hate all the math and measuring and ironing, so I go about things exactly the wrong way and take a ton of short cuts. If you want to sew from patterns and get exact measurements, I am not your gal. This is also not really a beginner project, but I’ll walk you through how I made this dress.

Fabrics for Elsa costume. These were all found at Walmart

This is the way I do it.

First, I have my daughter lie down on the wrong side of the fabric so that I can get an idea for the length. I mark her shoulders with sidewalk chalk. I always cut outside my chalk line. The chunky line from the sidewalk chalk gives me a built-in seam allowance.

trace your model

mark your measurements in chalk

Then I use a dress that fits her well and trace around it to get a shape.

trace a dress trace a shape in chalk

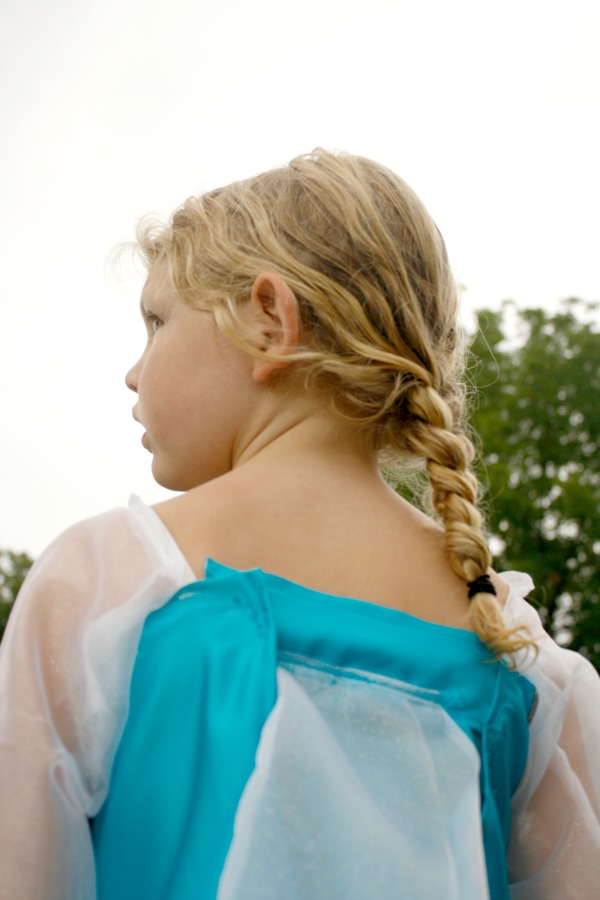
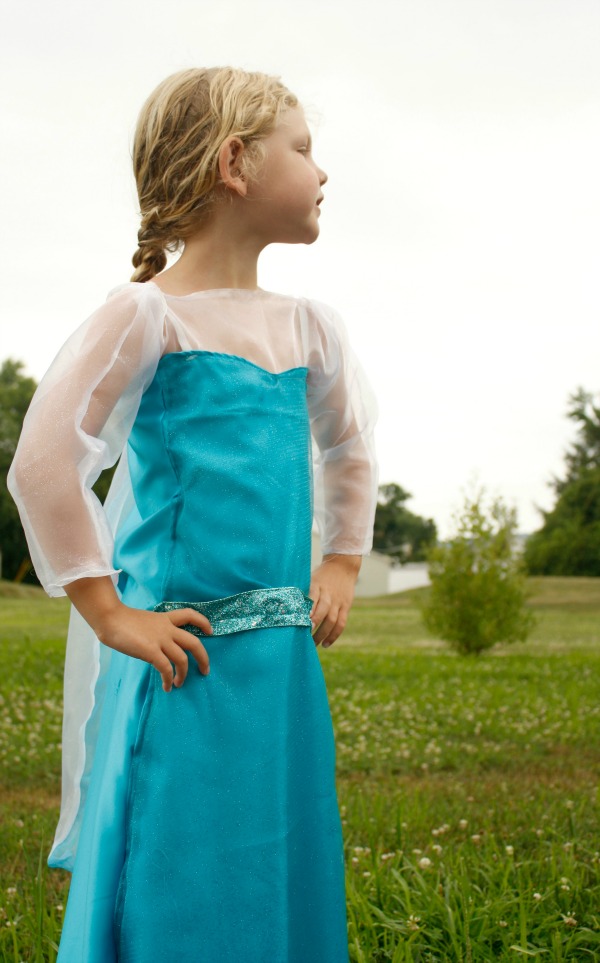
I marked the heart shaped neckline that I wanted. Then I cut out two pieces of the blue fabric and sewed them right sides together down the sides.  I hemmed the top and the bottom.

It’s hard to see in the photos, but there is also a blue sparkly fabric overlaying the front of the dress. 

I did the sleeves the same way I described above- I made Abby lie down and I drew the shape of her arms on the fabric, leaving a lot of extra room because I wanted the sleeves to be puffy.

I attached them to a strip of sheer white fabric in the front, then sewed the white section onto the top of the blue dress. I also hid some elastic straps under the sheer fabric to hold the dress up.

The closure in the back is just Velcro.

I attached a wide matching ribbon for the belt and Abby requested a cape, so I sewed one onto the back of the dress. 

elsa dress hidden elements

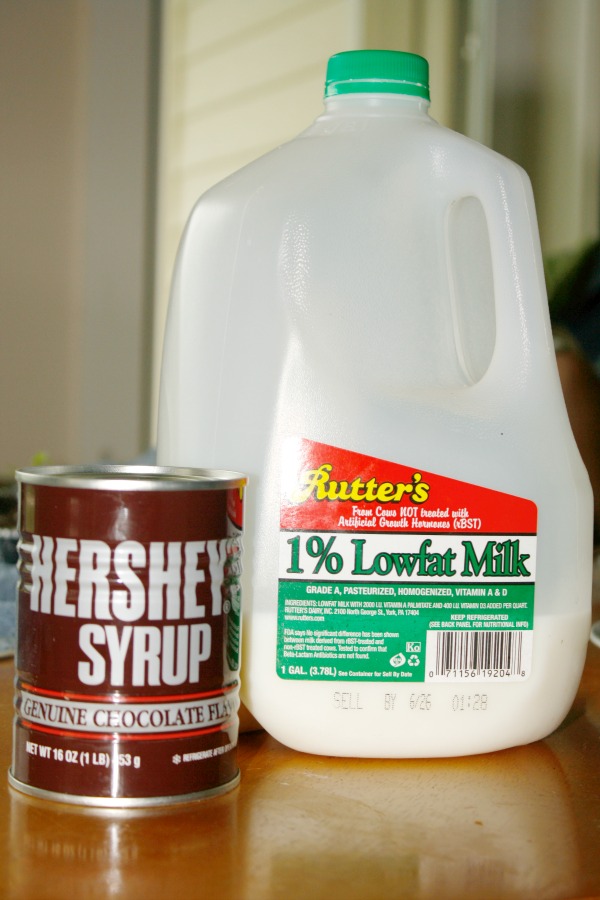
I bought all of my fabric and supplies at Walmart. You can definitely make this dress for less than $20.

For a size 6 dress I bought:

  • 2 yards of blue  $6 each
  • 1 yard of sparkly blue (front overlay)  $3
  • 1 yard of sheer, sparkly white $3
  • wide blue sparkly ribbon (belt) $3
  • blue and white thread $2
  • 1 pack of elastic $1

I had a ton of extra fabric, though, so I really think you could get away with 1 yard of blue and 1/2 a yard of the other fabrics. I plan to use the extra to make my younger daughter her own dress. The final cost for 2 dresses, based on the material I actually did use or this one (You can see in the photo up top that I bought some additional fabrics we decided we didn’t need after all), will be about $25.

If you make one please send a photo. I would love to see your homemade Elsa costume too!

 Elsa costume from Disney's Frozen

If you liked this project, don’t forget to pin it and come back soon.

Thanks for reading!


linking to Serenity Now

Share this:

  • Click to share on Facebook (Opens in new window)
  • Click to share on Pinterest (Opens in new window)
  • Click to share on Twitter (Opens in new window)
  • More
  • Click to share on Pocket (Opens in new window)
  • Click to share on Tumblr (Opens in new window)
  • Click to share on Reddit (Opens in new window)
  • Click to share on LinkedIn (Opens in new window)
  • Click to print (Opens in new window)

VIDEO: How to Pick Steamed Crabs

July 8, 2014 By: Stephaniecomment

Learn how to pick a steamed crab. It's a three minute video.

I was born and raised in Baltimore, Maryland. Steamed crabs are part of the culture. I grew up crabbing every summer with my dad and Poppop. They would catch a bushel at a time for several days in a row, then we would steam them and spend hours around the dining room table picking and eating the meat. We would pick and divide what was left so Mommom could make crab cakes and soup. I thought everyone ate them until I went to college and met someone who had never eaten a crab. We taught quite a few out-of-state friends the fine art of how to pick a steamed crab back in the day.

Eddie and I ordered crabs over the holiday last weekend, so I thought it would be fun to show you. This video was not taken from the most flattering angle of Yours Truly, but you’ll get the idea.

Watch me teach you how to pick steamed crabs in less than 3 minutes:


Share this:

  • Click to share on Facebook (Opens in new window)
  • Click to share on Pinterest (Opens in new window)
  • Click to share on Twitter (Opens in new window)
  • More
  • Click to share on Pocket (Opens in new window)
  • Click to share on Tumblr (Opens in new window)
  • Click to share on Reddit (Opens in new window)
  • Click to share on LinkedIn (Opens in new window)
  • Click to print (Opens in new window)

My grandma’s chocolate snowball recipe

June 20, 2014 By: Stephanie9 Comments

  old fashioned chocolate snowball recipe

chocolate snowball

chocolate snowball dessert

This was the very first recipe I ever learned to make. I remember being in my Mommom’s kitchen and helping to stir it up. I remember constantly opening the freezer door to see if it was ready.

I cannot go through a single summer without making it for my own kids.

I asked once where the recipe came from. Mommom said that she invented it decades ago. She read about something similar in the newspaper, but it had much fancier ingredients, ones that she couldn’t afford, so she made do with what she had. 

The result became a family tradition. I love that it perfectly embodies every memory I have of her: simple, modest, but totally satisfying and full of love. And fun for kids.

There are only two ingredients. She named it Chocolate Snowball because it was chocolate and it was cold.

  ingredients for chocolate snowball

It does not matter what kind of milk you use.

how to make chocolate snowball

Empty one can of chocolate syrup into a square freezer-safe baking dish. Then add one can of milk and one can of water. (Mommom used two cans of milk. My Aunt Charlotte modifies it to 1 can of milk and 1 can of water and I tend to do the same so that I don’t waste as much milk, plus it makes the end result easier to serve.)

Have some helpers stir for a few minutes until everything is evenly combined.

cooking with kids

making chocolate snowball with kids

Clear out a level surface in your freezer and very carefully transfer it there to freeze for at least 4-6 hours, preferably overnight.

chocolate snowball in the freezer

To serve, use a sharp knife to cut thin strips, then break each strip into small chunks and spoon into a dessert glass.

slicing chocolate snowball

It is almost similar to a chocolate Italian Ice from Rita’s.

chocolate snowball recipe

The customers are always happy.

adorable kiddos

Share this:

  • Click to share on Facebook (Opens in new window)
  • Click to share on Pinterest (Opens in new window)
  • Click to share on Twitter (Opens in new window)
  • More
  • Click to share on Pocket (Opens in new window)
  • Click to share on Tumblr (Opens in new window)
  • Click to share on Reddit (Opens in new window)
  • Click to share on LinkedIn (Opens in new window)
  • Click to print (Opens in new window)

2 Ingredient Homemade Dishwasher Detergent

April 28, 2014 By: Stephanie152 Comments

This post contains Amazon affiliate links to the products mentioned for your convenience. 

A simple trick to using Dawn in the dishwasher

“Stephanie, I ran out of dish detergent and tried this about a week ago and I cannot believe how clean my dishes got!!! Thank you!” -My friend Nicole via Facebook.

“So, I did this last night and it is AWESOME! No spots on any of the dishes that usually have TONS of spots on them! Thank you so much for sharing….we are never buying the pods again!” –Stephanie, a Binkies and Briefcases reader via Facebook

There’s is a “recipe” floating around blogland for homemade dishwasher detergent.

I think it started with Shaye from The Elliott Homestead.

I’ve heard Rebecca share the same thing.

But I haven’t seen anyone share and before and after pictures, so I’m here today to air our dirty laundry dishes.

I’ve been using this recipe for over a month now and it hasn’t failed me yet.

Did you know that you don’t need to buy a special detergent for your dishwasher? [Read more…]

Share this:

  • Click to share on Facebook (Opens in new window)
  • Click to share on Pinterest (Opens in new window)
  • Click to share on Twitter (Opens in new window)
  • More
  • Click to share on Pocket (Opens in new window)
  • Click to share on Tumblr (Opens in new window)
  • Click to share on Reddit (Opens in new window)
  • Click to share on LinkedIn (Opens in new window)
  • Click to print (Opens in new window)

What is “No Poo?” Homemade Shampoo and how to use it.

March 20, 2014 By: Stephanie14 Comments

No poo homemade shampoo recipe

Have you heard of this new “no poo” movement? It’s when people stop using regular store-bought shampoo on their hair and instead start using a homemade shampoo.

The most popular homemade shampoo recipe is very simple. [Read more…]

Share this:

  • Click to share on Facebook (Opens in new window)
  • Click to share on Pinterest (Opens in new window)
  • Click to share on Twitter (Opens in new window)
  • More
  • Click to share on Pocket (Opens in new window)
  • Click to share on Tumblr (Opens in new window)
  • Click to share on Reddit (Opens in new window)
  • Click to share on LinkedIn (Opens in new window)
  • Click to print (Opens in new window)

How to Create Your Own Social Media Icons: A Video Tutorial

February 27, 2014 By: Stephanie5 Comments

How to create your own social media buttons

I learned how to do this from Ashton over at Something Swanky. I got the social media silhouettes I use from her. She offers them for free in her own post about how to create your own social media icons. 

I wanted to make a video because this was one of the most confusing things I ever learned how to do as a blogger. Once you get the hang of it, though, it is pretty easy.

These videos do not have sound, but I think it is pretty self-explanatory if you watch the screens.

First, use a program like PicMonkey to create your graphic. 

Here is the video for how to do that. The silhouette images I use in the video for Facebook, Twitter, Pinterest, and Google+ all came from Ashton’s post.


Then upload your image into a draft blog post.

You need somewhere to host your image. I prefer to do it on my own blog. I have a draft marked “Buttons and Stuff: DO NOT DELETE.”

Next, use an image mapping tool to link your image to your social media accounts.

The tool Ashton used in her tutorial is no longer offering their service for free. Now I like to use a website called http://www.html-map.com/

Copy the image location from your draft blog post and paste it into the line on the image mapping website.

Create boxes on the image mapping site around each icon and link it to the corresponding social media site.

Finally, create a text widget (or html gadget if you are on

Blogger) with the code for your image.

Put a new text widget (WordPress) or html/javascript gadget (Blogger) in your sidebar. Just copy and paste the code from the image mapping website.

You can see what I mean in this video.


 I hope this was helpful!

I’d love to have you join me on Facebook and share the social media love. 

Watch a quick video tutorial on how to create social media buttons for a wordpress or Blogger blog

Share this:

  • Click to share on Facebook (Opens in new window)
  • Click to share on Pinterest (Opens in new window)
  • Click to share on Twitter (Opens in new window)
  • More
  • Click to share on Pocket (Opens in new window)
  • Click to share on Tumblr (Opens in new window)
  • Click to share on Reddit (Opens in new window)
  • Click to share on LinkedIn (Opens in new window)
  • Click to print (Opens in new window)

Creating a Family Meal Plan: How to Spend Less than $100 to Feed Your Family This Week

February 25, 2014 By: Stephanie5 Comments

Family Meal Planning

I have done meal planning posts before, but today I wanted to take some of the information and make it more organized and easier to follow. For several years our food budget was $75 a week to feed a family of four. I often still stay under the $100 mark, although I have since been able to raise our budget to around $125 per week.  [Read more…]

Share this:

  • Click to share on Facebook (Opens in new window)
  • Click to share on Pinterest (Opens in new window)
  • Click to share on Twitter (Opens in new window)
  • More
  • Click to share on Pocket (Opens in new window)
  • Click to share on Tumblr (Opens in new window)
  • Click to share on Reddit (Opens in new window)
  • Click to share on LinkedIn (Opens in new window)
  • Click to print (Opens in new window)

How to Take Great Pictures of Christmas Tree Lights

December 23, 2013 By: Stephanie4 Comments

How to make the lights on your tree look like stars in your Christmas photography

Credit: Tomashko

This post contains Amazon affiliate links to the products mentioned for your convenience. 

Merry Christmas, you guys!!! It’s almost Christmas Eve and Eddie has been asking me for a while if he could guest post on the blog about his latest passion: photography. Of course I said yes, and he has a very cool technique to share about how to photograph light. Particularly, Christmas tree lights.  

How to Make Christmas Tree Lights Look Like Stars with Your DSLR.jpg

Hey everybody, it’s Eddie. You know, the Hubs. By now you oughtta have that Christmas tree up. If not, what are you doing reading this? Go put it up!

It’s up? Good. Decorated and lit? Better. Photographed and ready for Facebook? Cool. After all, who doesn’t like to take a picture of their hard work? I know I like to. Did the picture come out kind of blah? Just not feelin’ it? Don’t worry, it happens. I’ll let you in on a secret (and by secret, I mean you can find this technique, in a sense, all over the internet) to make that picture shine a bit more. Here’s what you need to make the lights look like stars:

  1. DSLR Camera (a point-and-shoot just won’t cut it) We started with a Canon EOS Rebel  
  2.  Tripod (unless you have surgeon’s hands)
  3. Timer Shutter Release Remote Control (recommended, but not required)

That’s not too bad is it? You’ve got the gear, now you need the technique. First, a little explanation. If you’ve used your DSLR and understand some basic principles of photography, you’ll know that the aperture dictates the depth of field and therefore how much light is let in the camera. The smaller the aperture (higher f-stop, e.g. f/22), the greater depth of field, but the less light you let in. Conversely, the larger the aperture (lower f-stop, e.g. f/1.8), the shallower depth of field, but the more light you let in. Confused? Don’t worry. I noticed something the other day that (I think) translates well as an analogy:

Go stand in front of that lit tree. Open your eyes all the way (like someone just said something super surprising). Notice the way the lights “enter” your eye. The light is kind of “rounded.” Now squint your eyes until just a bit of the lights are showing. Notice how the lights turn into much sharper points and begin to develop rays? This principle is known as diffraction. The light is being squeezed through a much smaller opening and then bounced around inside your eye/lens. 

To get the starry look when you are taking pictures of Christmas tree lights, you’ll need to crank your aperture down to at least about f/8 or f/11. Problem is, you aren’t letting in much light because you’ve closed down the aperture and your shutter speed will be too low to handhold. In comes the tripod. Mount that sucker on the tripod (or a steady surface, like the kitchen counter, if you don’t have one). If you’ve got a remote shutter release, now is the time to use it to avoid camera shake. If not, set the shooting mode to have a 2-second delay to remove any vibration from pressing the shutter release. You may want to turn off the Image Stabilization or Vibration Reduction as well, since this will actually impart movement. Fire away. 

All of the following pictures are straight out of the camera: 

train_lights

This technique won’t work with things that are constantly moving (like kids!), but it is a very cool trick for making your photos of things that are standing still have some extra pop.  

Now that you know the technique, you can apply it to any light source that piques your interest.

starry house lights

how to shoot the moon

 Have fun!

You might also like:

5 Gifts to Give When You Are Broke. Some really creative ideas here!

Share this:

  • Click to share on Facebook (Opens in new window)
  • Click to share on Pinterest (Opens in new window)
  • Click to share on Twitter (Opens in new window)
  • More
  • Click to share on Pocket (Opens in new window)
  • Click to share on Tumblr (Opens in new window)
  • Click to share on Reddit (Opens in new window)
  • Click to share on LinkedIn (Opens in new window)
  • Click to print (Opens in new window)

Snowman Handprint Keepsake Ornaments

December 1, 2013 By: Stephanie5 Comments

snowman keepsake ornaments

Three years ago, Nicholas’ preschool class made these snowman hand print keepsake ornaments as the Christmas gift for the parents. Every year it makes me smile as I am unpacking it.

If you are looking for a cute, inexpensive way to personalize a gift for a grandparent or friend or to get the kids involved in making something, I think this is a very cool idea and it seems easy enough to do with young really kids.

Just dip your child’s hand in white paint and make a hand print, wrapping around the bottom of a smooth, dark ornament. 

When the pant is dry (I would stick it upside-down in styrofoam to let it dry without messing up the hand print), use paint pens or Sharpies to add details and make the fingers look like a family of snowmen. I’ve even seen stickers of snowman parts at the craft store you could use.

The back of our ornament says “Nicholas 2010.”

Let me know if you try it!


Linking to Tips and Tricks

Share this:

  • Click to share on Facebook (Opens in new window)
  • Click to share on Pinterest (Opens in new window)
  • Click to share on Twitter (Opens in new window)
  • More
  • Click to share on Pocket (Opens in new window)
  • Click to share on Tumblr (Opens in new window)
  • Click to share on Reddit (Opens in new window)
  • Click to share on LinkedIn (Opens in new window)
  • Click to print (Opens in new window)

How to heal your heels for flip-flop season

May 14, 2013 By: Stephanie22 Comments

tips for how to heal dry and cracked feet

Warning: This post is full of nasty pictures of my feet.

My feet are gross. They are the only part of my body that my husband truly cannot stand. They are SUPER dry and my heels crack and sometimes bleed.

How to heal dry, cracked feet

Once, as a gift, my mom even gave me a cream meant for a cow’s udders, hoping it would help. It didn’t.

Yes, I have already had a pedicure this year (and paid extra for the “scraping”) and  my heels still looked like this:

healing dry feet

Yuck. I know.

But then I read somewhere (I think it was a Facebook comment on a recipe) that coconut oil made a great moisturizer, so I decided to try it on my heels.

Method #1: Coconut Oil

We had this one on hand because it is what I like to use to pop our popcorn. They sell it at our regular grocery store. You can also buy it here.

I’ll walk you through how I use it in case you need to heal your heels too.

coconut oil for dry feet

It is solid in the container and looks like this

coconut oil

I use about a teaspoon’s worth for each foot.

I spread it on with a washcloth because I don’t like the way it makes my hands feel greasy for hours if I use my fingers.

coconut oil on heals

Grease up your feet and put on a pair of socks. Otherwise you will slip and fall trying to walk on laminate or tile floors. Not that I would know. (Yeah, I totally fell on my butt the first time.)

This is after 2 treatments. I’m going to continue twice a day every day until Thursday. There are still a few small cracks in the back right now. Hopefully after a few more treatments I won’t be too embarrassed to break out the flip-flops when we are in North Carolina for Bloggy Boot Camp this weekend!


healing dry feet with coconut oil

I should also note that I have REALLY sensitive, fair skin. I can’t even use most laundry detergents without breaking out in hives. The coconut oil is very gentle and doesn’t cause me any irritation. It also doesn’t have any odor, which is a plus.

Method #2: Stridex and Vaseline 

I have also had very good luck in the past with a tip I leaned on an old episode of the Oprah show. The doctor on the show said to use a Stridex pad (if I remember correctly, the dermatologist on the show said it has to be Stridex because the active ingredient in those pads was a little different than other brands), and then coating my feet with Vaseline and sleeping in a pair of white cotton socks. After about a week of using that method my feet were perfect! 

Let me know if you try either one of these tips and how they work for you!


Share this:

  • Click to share on Facebook (Opens in new window)
  • Click to share on Pinterest (Opens in new window)
  • Click to share on Twitter (Opens in new window)
  • More
  • Click to share on Pocket (Opens in new window)
  • Click to share on Tumblr (Opens in new window)
  • Click to share on Reddit (Opens in new window)
  • Click to share on LinkedIn (Opens in new window)
  • Click to print (Opens in new window)
  • 1
  • 2
  • 3
  • Next Page »
  • Facebook
  • Instagram
  • Pinterest
  • RSS
  • Twitter

Welcome! I’m Steph.

This is a little corner of the internet we like to fill with honesty, heart, and humor. Read More…

Cover for Binkies and Briefcases with Stephanie Giese
19,205
Binkies and Briefcases with Stephanie Giese

Binkies and Briefcases with Stephanie Giese

Stephanie Giese is an indie author based in Florida. She writes stories about realistic problems with humor, heart, and sass. Her work has a strong focus on mental health and consent. Her North Bay small-town romance series is set for release in 2025.

Binkies and Briefcases with Stephanie Giese

4 months ago

Binkies and Briefcases with Stephanie Giese
I know it’s a small thing, but I believe small things can add up to big changes. my entire North Bay series, including Out of Left Field, Right as Rain, and Way Off Base, is free on Kindle from Jan. 30-Feb. 3. Please take the funds you might have spent on my books this week and reallocate them toward the areas in our country that need them the most. Follow creators like Dad Chats who can direct you toward practical needs local to them. I hope my quirky romcoms can bring you some comfort and joy during difficult times, and I hope together we can take small, practical steps toward big changes. ... See MoreSee Less

Photo

View on Facebook
· Share

Share on Facebook Share on Twitter Share on Linked In Share by Email

Binkies and Briefcases with Stephanie Giese

4 months ago

Binkies and Briefcases with Stephanie Giese
I know there is an overall feeling of helplessness in our country right now. So many of us are at a loss for what to do beyond making phone calls and social media posts (which are still important, but can feel like not enough). I believe strongly in the power of small things adding up to big ones. As one person, I might not be able to do much, but what I CAN do is use my voice and my books to work toward the change I’d like to see. That’s why, for the next five days, from Jan. 30-Feb 3, I’m making the Kindle versions of my entire North Bay series (Out of Left Field, Right as Rain, and Way Off Base) completely free. Art has power, and I do hope these comedies can bring you some comfort and joy in difficult times, but most importantly, I also hope you’ll consider redirecting the funds you might’ve spent on my books and donating instead to one of the many charities working tirelessly in our cities right now. If you are located in an area like Minnesota or Portland, please use the space below to make people aware of the organizations in your area that need help. ... See MoreSee Less
View on Facebook
· Share

Share on Facebook Share on Twitter Share on Linked In Share by Email

Reader’s Choice

Image HTML map generator

Follow Me on Pinterest

featured-on

What You’re Saying

  • 28 Best Stone Fireplace Ideas And Designs - Perfect Decor Place on DIY Stone Fireplace with AirStone
  • Kevin Hicks on How to Budget for Building Your Own Home
  • Amy on DIY Stone Fireplace with AirStone
  • Gendered clothing - GenderEd on A Target Intervention on Behalf of My Daughters
  • Wellshop Store on Dressing Our Daughters: How Target Responded to My Last Blog Post

Latest Posts

ALL I Never Knowed: The Book Is Here!

If you’re new here, you may want to subscribe to my Email Newsletter. Thanks for visiting!Welcome back! Be sure to check out my Email Newsletter. Thanks for visiting!It’s finally here, in my hands. It has been a loooong time in the making, but our book, All I Never Knowed: Mental Illness, a Mother’s Love, and […]

Share this:

  • Click to share on Facebook (Opens in new window)
  • Click to share on Pinterest (Opens in new window)
  • Click to share on Twitter (Opens in new window)
  • More
  • Click to share on Pocket (Opens in new window)
  • Click to share on Tumblr (Opens in new window)
  • Click to share on Reddit (Opens in new window)
  • Click to share on LinkedIn (Opens in new window)
  • Click to print (Opens in new window)

Save Money with Fetch

Hey everyone! This is Chelsea, Steph’s asistant, back with the simplest app for getting cash back on things you’re already buying! We’ve covered Ibotta, Shopkick, Coupons.com, Swagbucks and we’re all saving hundreds of dollars by now, right? RIGHT!? I’m really hoping you guys have jumped on the rebate app savings train because it’s just so […]

Share this:

  • Click to share on Facebook (Opens in new window)
  • Click to share on Pinterest (Opens in new window)
  • Click to share on Twitter (Opens in new window)
  • More
  • Click to share on Pocket (Opens in new window)
  • Click to share on Tumblr (Opens in new window)
  • Click to share on Reddit (Opens in new window)
  • Click to share on LinkedIn (Opens in new window)
  • Click to print (Opens in new window)

Splendid Spoon Review

I was excited to receive a box of products to try from Splendid Spoon this summer! They invited me to try their line of plant-based, ready-to-eat foods and delivered them right to my door. Check one in the pro column for convenience. I did receive these products free of charge in order to rate them […]

Share this:

  • Click to share on Facebook (Opens in new window)
  • Click to share on Pinterest (Opens in new window)
  • Click to share on Twitter (Opens in new window)
  • More
  • Click to share on Pocket (Opens in new window)
  • Click to share on Tumblr (Opens in new window)
  • Click to share on Reddit (Opens in new window)
  • Click to share on LinkedIn (Opens in new window)
  • Click to print (Opens in new window)

My Networks

#BlogHer15: Experts Among Us Voices of the Year Honoree